On this page
- Set Up the Customer Ordering Flow
- Build a delivery-ready menu in WooCommerce
- Enable delivery, pickup, opening hours, and checkout rules
- Configure delivery dates, time slots, and lead times
- Configure Delivery Zones, Fees, and Fulfillment Rules
- Create delivery zones by ZIP code, city, or radius
- Set delivery fees and shipping cost calculation
- Match valid time slots to each delivery area
- Run Kitchen and Dispatch Operations After Checkout
- Send new orders to staff with printing and notifications
- Use order statuses to track prep and handoff
- Control prep time and kitchen capacity during peak hours
- Dispatch Drivers, Update Customers, and Complete the Order
- Prepare driver handoff with delivery details and courier vouchers
- Keep customers informed with order status updates
- Conclusion: Build a workflow that is fast, clear, and reliable
- Create a Restaurant Online Ordering System with WordPress & WooCommerce
- FAQs
- How many delivery zones should I start with?
- What should I do if a time slot fills up too fast?
- Which order updates should customers receive by SMS?
- Related Blog Posts
If your WooCommerce food orders are late, missed, or hard to track, the fix is usually the workflow.
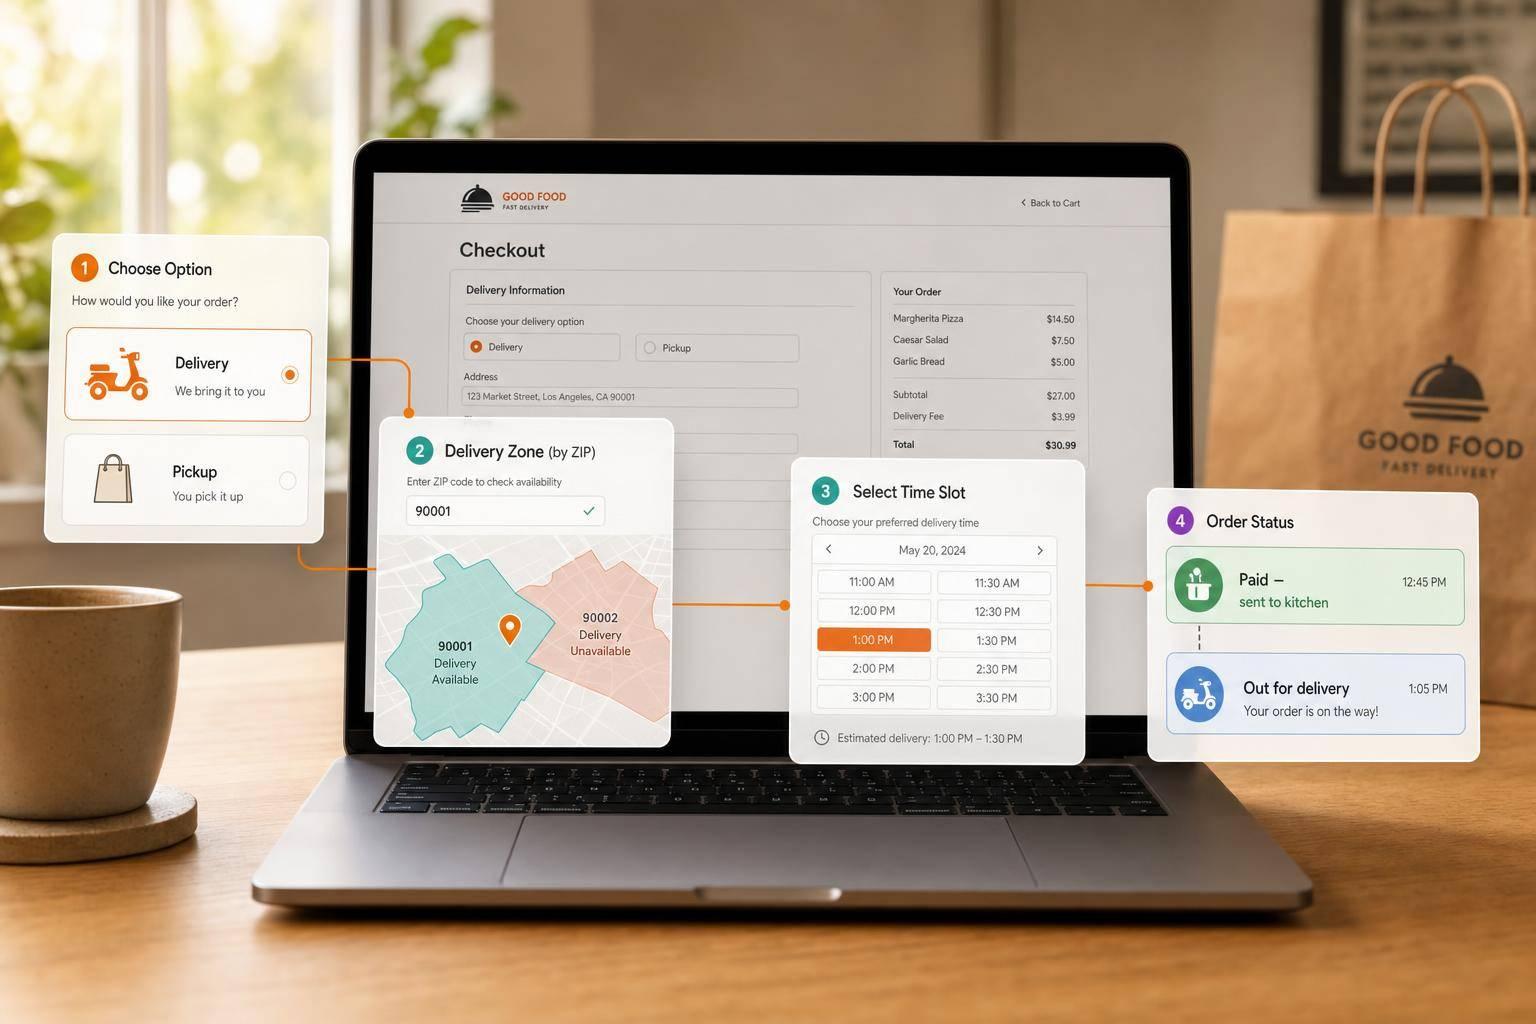
I’d set it up like this: let customers choose Delivery or Pickup, limit delivery by ZIP code, show only valid date and time slots, send paid orders straight to the kitchen, move each order through clear status steps, then finish with driver handoff and customer alerts. For many stores, 30-minute slots, 45 to 90 minutes of lead time, and status updates within 2 minutes can help cut delays and order mistakes.
Here’s the full flow in plain English:
- Customer picks menu items
- Customer chooses Delivery or Pickup
- Delivery orders require a U.S. address and ZIP code
- Checkout shows only valid AM/PM time slots
- Fees apply by zone, distance, or order total
- Paid orders go to staff right away
- Kitchen and front desk move orders through set statuses
- Driver gets address, notes, and payment details
- Customer gets email, SMS, or dashboard updates
- Staff marks the order Completed after drop-off
A few setup points matter most:
- Use menu categories like Mains, Sides, and Drinks
- Keep item options short to lower kitchen mistakes
- Match order windows to kitchen load, not just store hours
- Cap each slot based on how many orders your team can make
- Use lower fees for nearby zones and higher fees for longer trips
- Hide delivery when an address is outside your service area
In short: I’d build the store so checkout only offers what your team can actually fulfill. That keeps the kitchen, drivers, and customers on the same page from order to handoff.
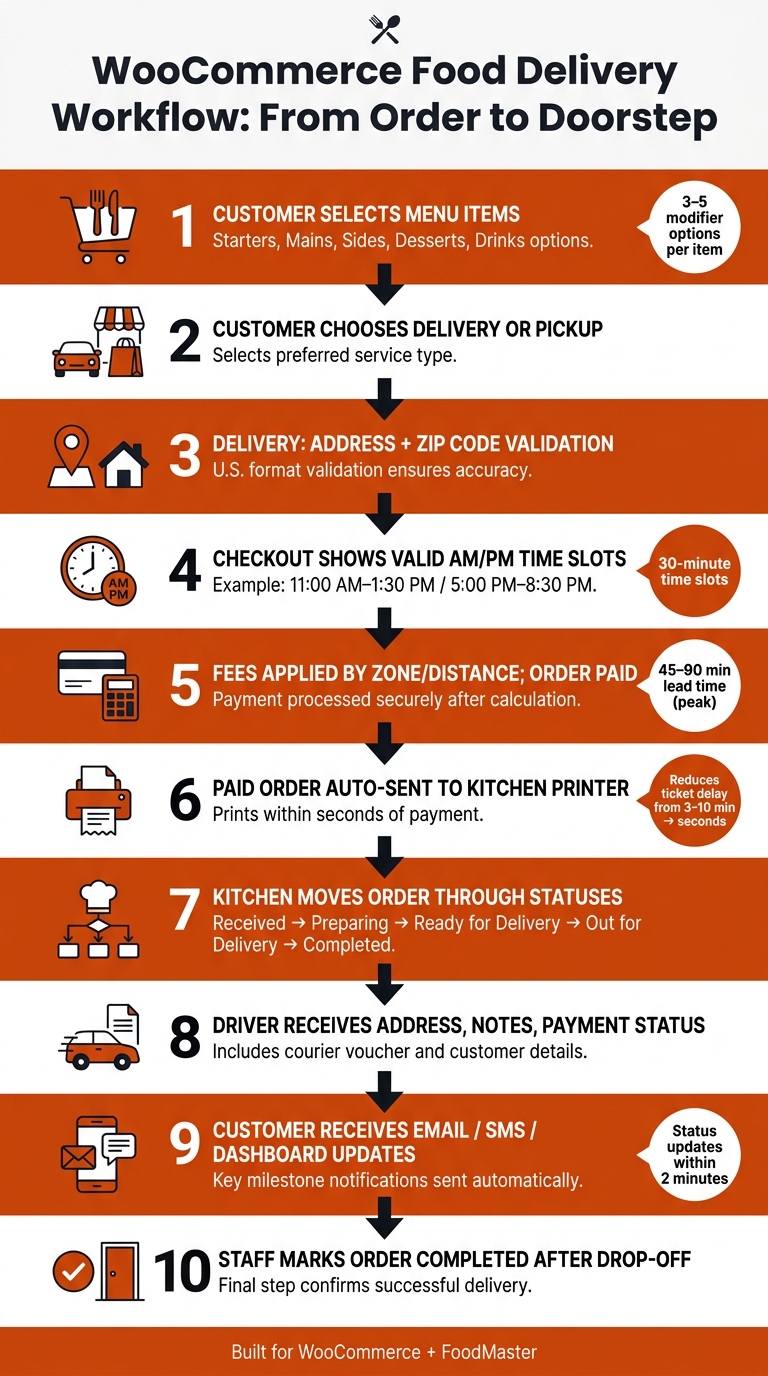
WooCommerce Food Delivery Workflow: From Order to Doorstep
Set Up the Customer Ordering Flow
Build a delivery-ready menu in WooCommerce
Add each dish to WooCommerce as its own product. Give it a clear title, a short description, a USD price like $12.99, and an image.
Then sort items into categories like Starters, Mains, Sides, Desserts, and Drinks. That way, customers can jump straight to what they want instead of scrolling through a huge list.
FoodMaster can show those categories as tabs or as sections on one menu page. That makes ordering feel much smoother because people can add several items without bouncing from page to page.
For modifiers, keep it tight: 3–5 key options per item is a good rule of thumb. Show them in a popup. If you pile on too many choices, checkout slows down and the kitchen has more room for mistakes.
Once the menu is live, the next step is setting checkout rules that decide when delivery orders can come in.
Enable delivery, pickup, opening hours, and checkout rules
Make Delivery and Pickup the first choice at checkout.
Your order windows should match what the kitchen can handle, not just when the restaurant is open. A simple setup is to use two separate windows, such as 11:00 AM–1:30 PM for lunch and 5:00 PM–8:30 PM for dinner, and block orders outside those hours.
When the restaurant is closed, show the next open window on the site instead of a vague error message. It gives customers a clear next step.
At checkout, require:
- Street
- City
- State
- ZIP code
- One optional apartment or suite field
Address autocomplete helps cut down on typos. That’s a big help on mobile, where entering an address can feel like a chore.
Configure delivery dates, time slots, and lead times
Your slot length should line up with what the kitchen can actually produce. For many restaurants, 30-minute slots are a solid starting point.
Here’s the tradeoff:
- 15-minute slots give customers more choice, but they make scheduling harder
- 60-minute slots ease kitchen pressure, but can feel too loose for people who want a more exact delivery window
Lead time should cover both prep time and drive time. During a busy dinner rush, a 45- to 90-minute minimum lead time can help prevent rushed orders.
It also helps to pair lead time with order caps per slot. If the kitchen can handle 12 orders per hour, set the slot cap to match. That keeps bottlenecks from building before service gets slammed.
For smaller kitchens, use shorter lead times and lower slot caps. Go with longer lead times and higher caps only if staffing can handle it.
After that, you’re ready to line up those slots and lead times with your delivery zones and fees.
Configure Delivery Zones, Fees, and Fulfillment Rules
Create delivery zones by ZIP code, city, or radius
Once your ordering rules are in place, the next step is simple: connect them to the places you actually serve. In WooCommerce, head to Settings → Shipping and create a dedicated Local Delivery zone. From there, add the areas you can cover within your promised window, whether that’s by ZIP code, city groups, or a delivery radius for a few nearby blocks or a single neighborhood.
Set up your zones from the most specific to the broadest. That way, WooCommerce applies the right rule first. If an address falls outside those zones, Delivery won’t appear at checkout. That’s a clean way to block orders you can’t fulfill.
Set delivery fees and shipping cost calculation
Your delivery fees should match what delivery costs you in plain terms: driver time, fuel, and the order value needed to make each trip worth it. Most restaurants stick with a few common setups:
| Fee Model | Example | Best For | Tradeoff |
|---|---|---|---|
| Flat fee by ZIP | $4.99 on all orders in covered ZIPs | New restaurants keeping it simple | May undercharge long trips or overcharge nearby customers |
| Free above cart threshold | Free delivery on orders over $35.00 | Boosting average order value | Restaurant absorbs the delivery cost |
| Tiered by distance or zone | $3.00 within 2 mi / $5.00 within 5 mi / $8.00 within 8 mi | Mature operations with driver data | More setup and clearer checkout communication needed |
A good rule of thumb: charge less for close-in zones and more for outer areas. Base that on distance, driver cost, parking, and travel time. You can also set a minimum order by zone so longer trips still make sense financially.
Once each zone has its own pricing, you can tighten checkout even more by showing only the time slots that area can support.
Match valid time slots to each delivery area
Not every zone should use the same delivery windows. Nearby areas can handle shorter windows. Outer zones usually need fewer slots and later options.
In FoodMaster, you can assign schedules by zone so checkout only shows the slots that fit the customer’s address. When a shopper enters their ZIP code, WooCommerce matches the zone, applies the right fee, and displays only the slots that work with prep time and drive time. Slots that don’t work stay hidden.
That keeps checkout in sync with what your team can actually deliver.
Run Kitchen and Dispatch Operations After Checkout
Send new orders to staff with printing and notifications
Once payment goes through and the order hits the kitchen queue, send it straight to print and alert staff at once. When an order moves to Processing, FoodMaster sends it to the kitchen printer within seconds.
The kitchen ticket should show only what the team needs to prep and send out the order:
- Item names
- Quantities
- Modifiers
- Delivery or pickup time
- Customer name
- Phone
- Address
- Order ID
- Payment method
For U.S. orders, show prices with a dollar sign and two decimals, like $14.99. Use 12-hour time, like 7:30 PM.
Email or SMS works well as a backup alert for managers and dispatch. A subject line like "NEW DELIVERY ORDER – 7:15 PM Time Slot" is easy to spot on a phone when things get busy.
Use order statuses to track prep and handoff
A simple five-step chain keeps the kitchen, front-of-house, and drivers on the same page: Received → Preparing → Ready for Delivery → Out for Delivery → Completed. That setup makes it clear who acts next and when.
| Status | Who acts | What happens |
|---|---|---|
| Received | Kitchen | Ticket prints; order enters the queue |
| Preparing | Kitchen staff | Cooking begins; customer can be notified |
| Ready for Delivery | Dispatch/front-of-house | Order is packed and labeled; driver is assigned |
| Out for Delivery | Driver | Customer receives an estimated arrival notification |
| Completed | Dispatch or front-of-house | Driver confirms handoff; order is closed |
Train staff to update the order within 2 minutes of what actually happened. That way, the customer view and the dispatch view stay in sync.
With prep and handoff tracked in real time, the next move is driver dispatch and customer updates.
Control prep time and kitchen capacity during peak hours
Use slot caps and lead times to block full windows at checkout. FoodMaster hides full slots instead of taking orders the kitchen can’t handle, which keeps volume in line with what the staff can fill.
Manual handling can add 3 to 10 minutes before the kitchen even sees a ticket. Automatic printing and clear order statuses shrink that delay to seconds and keep the flow clean as order volume goes up.
| Dimension | Manual handling | Automated printing + clear order statuses |
|---|---|---|
| Speed | 3–10 minute ticket delay | Prints in seconds |
| Error risk | Higher | Lower |
| Scalability | Breaks down at higher volume | Handles higher volume |
sbb-itb-7e654f7
Dispatch Drivers, Update Customers, and Complete the Order
Prepare driver handoff with delivery details and courier vouchers
Once an order is marked Ready for Delivery, dispatch needs a handoff that’s simple and complete. Drivers should leave with access notes, drop-off instructions, the WooCommerce order ID, and payment status already in hand. That gives them what they need to answer basic questions on the road without calling back to the kitchen.
FoodMaster generates courier vouchers that pull these details into one printable dispatch sheet. Putting delivery items, destination, and required arrival time in one standard format helps cut pickup mistakes. It also lets drivers check the order in seconds instead of bouncing between screens.
Keep customers informed with order status updates
After dispatch starts, automated email and SMS status updates help customers track what’s happening. The best setup ties messages to key order changes, so people know where the order stands and what to expect next.
Different channels do different jobs:
- Email works best for confirmations, receipts, and other details customers may want to look up later.
- SMS is the top pick for urgent messages, like out-for-delivery alerts or delay notices.
- Dashboard alerts are useful for live tracking, but not as the main alert method. Many customers leave the site after checkout, so they may never see them.
| Channel | Speed | Reliability | Setup effort | Best use |
|---|---|---|---|---|
| Moderate | High | Low | Order confirmation, receipt, post-delivery record | |
| SMS | Fast | Very high | Moderate | Dispatch alert, delay notice, urgent delivery updates |
| Dashboard | Immediate while logged in | Depends on whether the customer returns to the site | Moderate | Real-time status viewing during checkout or reorder flows |
A layered setup usually works best: email for confirmation and records, SMS for urgent milestones, and the dashboard for live status tracking. The key is not to overdo it. Too many alerts stop being helpful and start blending into the background.
Conclusion: Build a workflow that is fast, clear, and reliable
A solid WooCommerce food delivery workflow connects each stage: menu, zones, time slots, kitchen handoff, driver dispatch, customer updates, and order completion. When those parts work together, the system stays clear and dependable from checkout to delivery.
Create a Restaurant Online Ordering System with WordPress & WooCommerce
FAQs
How many delivery zones should I start with?
Start with one manageable delivery zone that fits your kitchen capacity and driver availability. Keeping the area small and clearly defined makes it easier to keep delivery times steady and service quality on point.
FoodMaster lets you set zones by radius, postal codes, or city list. As you grow, you can add more zones, adjust boundaries, and set different delivery fees or minimum order amounts.
What should I do if a time slot fills up too fast?
Manage kitchen capacity before service quality starts to slip. Set a cap on how many orders you accept in each time slot based on what your team can actually handle, then use dynamic queue adjustments to add buffer time as order volume goes up.
If your kitchen is still getting overwhelmed on a regular basis, use the throttling feature to pause incoming orders during peak periods. That gives your team some breathing room and helps you avoid overcommitting staff.
Which order updates should customers receive by SMS?
Configure SMS notifications for three key order stages:
- Order Confirmed: Send this right after the order is placed. Include the confirmation and an estimated delivery time.
- Out for Delivery: Send this when the order enters the final transit phase.
- Custom status updates: Add any other updates as the order moves along.
These are the core updates that keep customers informed in real time.
Related Blog Posts
Commission-free ordering
Run restaurant orders on your own WordPress site
FoodMaster adds delivery, pickup, dine-in, POS, and kitchen tools — with zero per-order fees.