On this page
- Install WooCommerce and FoodMaster
- Install WooCommerce and complete the basic store setup
- Upload and activate FoodMaster
- Install checklist
- Build the Menu: Categories, Items, and Order Options
- Create menu categories for clear browsing
- Add dishes as products with the right pricing model
- Set up add-ons and menu display in FoodMaster
- Configure Pickup, Delivery, and Checkout
- Set pickup and delivery rules
- Add hours, lead times, tips, and taxes
- Prepare checkout and kitchen workflow
- Improve Mobile Ordering and Launch the System
- Improve the mobile ordering flow
- Run a full test order before launch
- Conclusion: Launch a Working WordPress Restaurant Ordering System
- Create a Restaurant Online Ordering System with WordPress & WooCommerce
- FAQs
- What WordPress hosting setup do I need first?
- How should I choose between simple, variable, and add-on products?
- What should I test before taking real online orders?
- Related Blog Posts
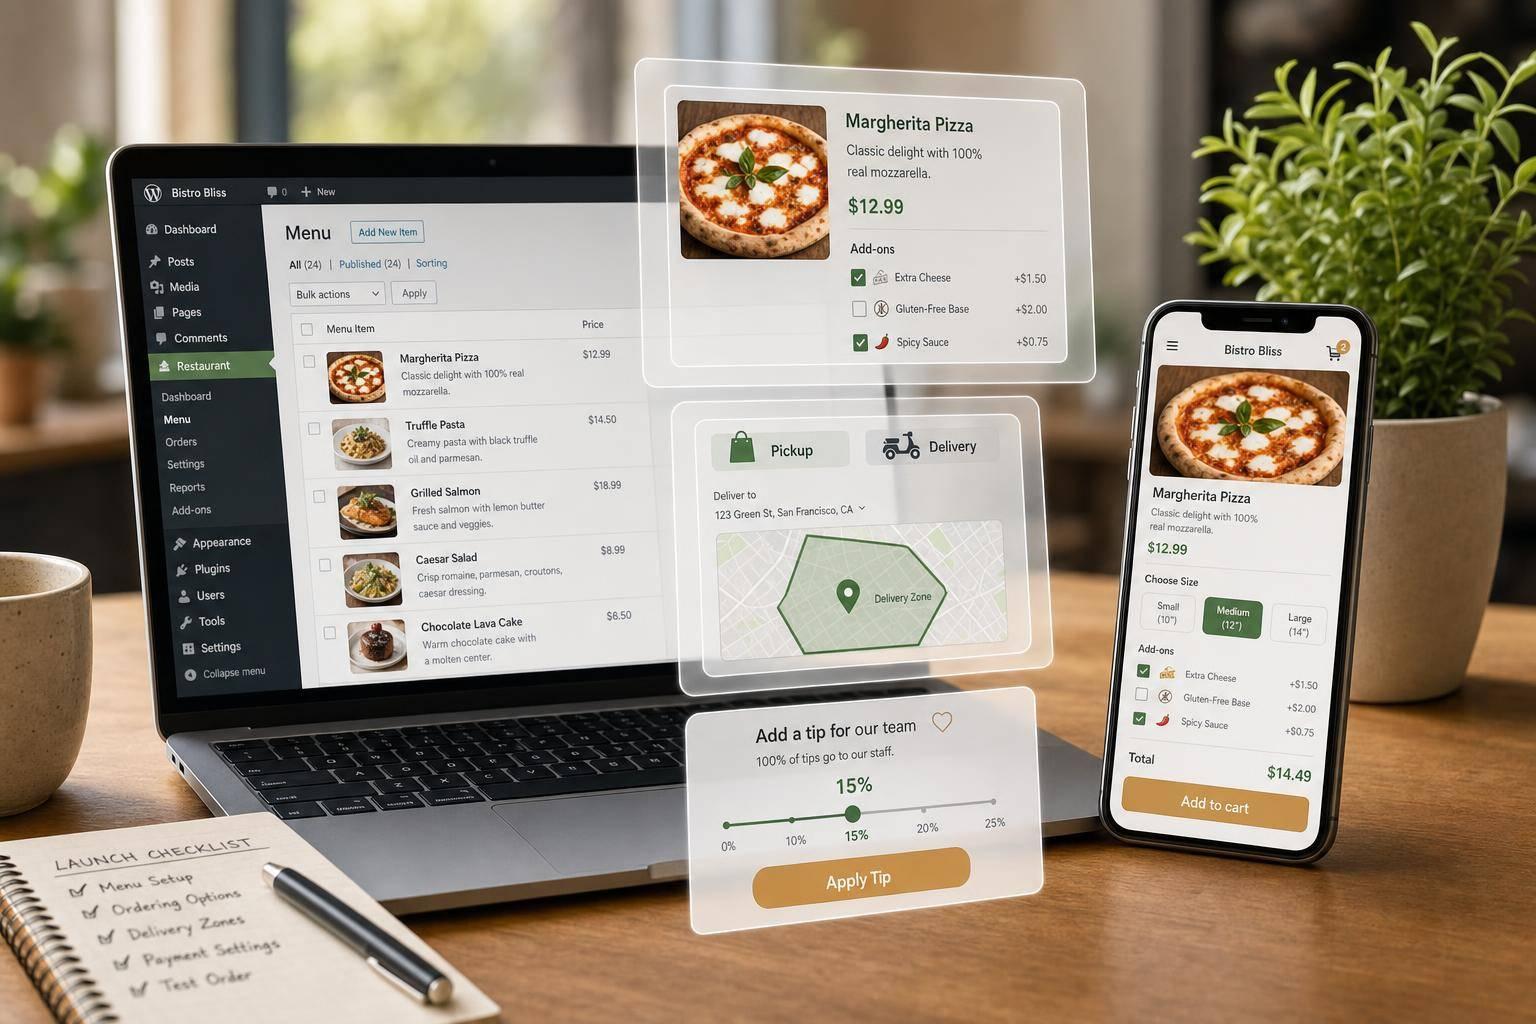
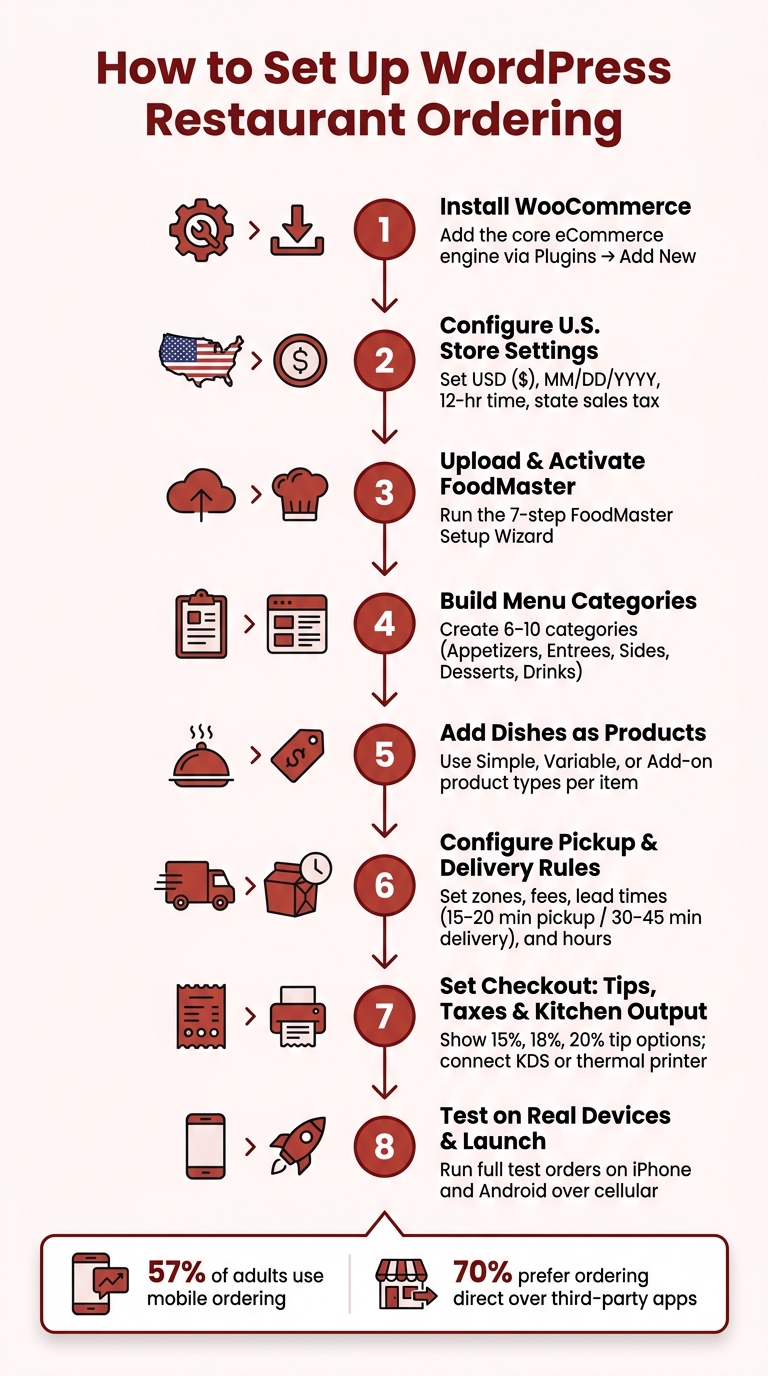
You can set up restaurant ordering in WordPress with WooCommerce and FoodMaster. That setup lets people browse your menu, pick add-ons, choose pickup or delivery, leave a tip, and pay online from a phone or computer.
I’d keep the setup focused on a few things:
- Install WooCommerce for products, cart, checkout, taxes, and payments
- Add FoodMaster for menu layouts, item options, pickup and delivery rules, business hours, and kitchen printing
- Build a clear menu with categories like Appetizers, Entrees, Sides, Desserts, and Drinks
- Use the right product setup for each dish: simple, variable, or add-ons
- Set U.S. store details like USD ($), MM/DD/YYYY, 12-hour time, ZIP codes, and state sales tax
- Set pickup and delivery rules with lead times, service hours, fees, and minimum order amounts
- Show tip choices like 15%, 18%, 20%, plus a custom tip
- Test the full order flow on iPhone and Android before launch
A few numbers stand out. The article notes that 57% of adults recently used mobile ordering, and 70% of consumers would rather order direct from a restaurant than use a third-party app. So if I were setting this up, I’d make mobile ordering the first priority, not an afterthought.
Here’s the short version:
| Area | What to set up |
|---|---|
| Platform | Self-hosted WordPress site with SSL and PHP 8+ |
| Store engine | WooCommerce |
| Restaurant features | FoodMaster |
| Menu structure | 6–10 main categories, short names, mobile-friendly layout |
| Fulfillment | Pickup, Delivery, or Dine-In |
| U.S. settings | $12.50, 07/14/2026, 11:30 AM, State + ZIP |
| Checkout | Taxes, delivery fee, tip, and total shown as separate lines |
| Final step | Run test orders with Stripe test mode |
In short, the article shows how to turn a WordPress site into a working restaurant ordering system that customers can use fast and staff can process without confusion.
How to Set Up Restaurant Ordering in WordPress: Step-by-Step
Install WooCommerce and FoodMaster
Install WooCommerce and complete the basic store setup
Open your WordPress dashboard and go to Plugins → Add New. Search for WooCommerce, click Install Now, and then Activate. After that, go through the setup wizard and enter your restaurant’s full address. Set the currency to U.S. dollars so prices show like $12.50.
Next, turn on tax calculations and add your state and local sales tax rules based on your restaurant’s location. WooCommerce will also create your Cart and Checkout pages for you during setup. When the wizard is done, go to WooCommerce → Settings → Advanced and make sure both pages are assigned the right way. If one is missing, create it manually and link it to the matching WooCommerce page.
Upload and activate FoodMaster
Once you buy FoodMaster, you’ll get a ZIP file. In WordPress, go to Plugins → Add New → Upload Plugin, choose the ZIP file, click Install Now, and then Activate. After activation, run the FoodMaster Setup Wizard from the admin notice. It’s a 7-step guided flow that walks you through branding, demo content, business hours, and order types like Delivery, Pickup, and Dine-In.
While going through the wizard, choose Import Products to load sample categories and menu items. When asked, enter your license key to get updates and support. After setup, head to FoodMaster → Settings. That’s where you’ll control the order page layout, menu display, pickup and delivery rules, tipping, and automatic printing. At this point, you’ll have the core restaurant ordering setup in place, ready for the menu build.
Install checklist
Use this table as a quick gut check before you start building your menu.
| Step | Dashboard Location | Purpose |
|---|---|---|
| Set Permalinks to Post name | Settings → Permalinks | Clean URLs like /menu/margherita-pizza |
| Set Timezone | Settings → General | Keeps hours accurate |
| Install WooCommerce | Plugins → Add New | Core eCommerce engine |
| Configure USD & Tax | WooCommerce → Settings | U.S. dollar currency and sales tax |
| Enable Payments | WooCommerce → Settings → Payments | Enables payments |
| Verify Cart & Checkout Pages | WooCommerce → Settings → Advanced | Confirms Cart and Checkout pages |
| Upload FoodMaster | Plugins → Add New → Upload Plugin | Restaurant-specific features |
| Enter License Key | FoodMaster → Settings | Activates updates and support |
| Run FoodMaster Wizard | Dashboard Notification | Configures branding, demo menu, hours, and order types |
With both plugins installed, you’re ready to move on to categories, menu items, and ordering options.
Build the Menu: Categories, Items, and Order Options
Create menu categories for clear browsing
With WooCommerce and FoodMaster in place, start by building a professional online menu customers will actually use. The goal is simple: organize it the way guests think, not the way the kitchen works.
Create 6–10 top-level categories such as Appetizers, Entrees, Pizzas, Sides, Desserts, and Drinks. If a section needs more detail, add subcategories like Kids Menu or Gluten-Free Options. Keep names short so they look clean on mobile screens.
Add dishes as products with the right pricing model
Add each dish as a WooCommerce product with:
- a product name
- a short description
- a featured image
- a price in USD
In the short description, include portion details and dietary tags like GF, V, or VG. That small bit of context helps customers decide fast.
Pick the simplest product type that fits the item:
| Product Type | Typical Use Case | Pricing | Best Fit |
|---|---|---|---|
| Simple Product | Sides, basic desserts, single drinks | One fixed price (e.g., $6.50) |
Items with no size or type differences |
| Variable Product | Pizzas by size, combo meals, protein choices | Different price per variation (e.g., 10" $12.00, 14" $16.00, 18" $21.00) |
Items where size or protein changes the price |
| Product with Add-ons | Burgers with toppings, build-your-own bowls | Base price + add-on fees (e.g., +$1.50 for bacon) |
Items that need extras without making dozens of variations |
Use add-ons for toppings, sauces, and extras instead of building a huge list of variations. It keeps the menu cleaner and makes setup much less of a headache.
Set up add-ons and menu display in FoodMaster
In FoodMaster, create Extra Option Categories first, then connect them to the right products. Group options by purpose. Use radio buttons when customers should pick one option, and checkboxes when they can choose more than one.
Make paid options easy to spot. Show the price right next to each one, like "Bacon +$1.75" or "Avocado +$2.00".
Then choose a FoodMaster menu layout:
- Accordion
- Side Menu
- Sticky Tabs
Turn on the AJAX modal too. That lets customers customize and add items without leaving the page, which makes ordering feel smoother before you move on to pickup, delivery, and checkout settings.
Configure Pickup, Delivery, and Checkout
Set pickup and delivery rules
Once your menu is ready, the next step is to connect ordering, fulfillment, and checkout. In FoodMaster’s Order Types settings, turn on the services your restaurant offers: Pickup, Delivery, or Dine-In.
For pickup, enter your restaurant’s address using standard U.S. fields: Street, City, State, and ZIP code. Use the two-letter state format, like IL or TX.
For delivery, pick a delivery-zone method. FoodMaster gives you three options:
- A distance-based radius in miles
- A ZIP code list
- A map-drawn delivery zone
From there, set fees by zone and block orders that fall outside your delivery area. You can also set a minimum order amount for each zone. For example, $20.00 for nearby zones and $30.00 for outer ones can help keep delivery worth the cost. It also helps to set free-delivery thresholds a little above your average order value.
One more thing: turn off any WooCommerce shipping methods that might clash with FoodMaster. If you don’t, customers may see duplicate or confusing choices at checkout.
Add hours, lead times, tips, and taxes
In FoodMaster’s scheduling settings, set your opening days and service hours for each order type on their own. A common setup might look like this: Pickup available Monday through Sunday from 11:00 AM to 9:00 PM, and Delivery from 11:30 AM to 8:30 PM.
Next, add prep buffers, which are the time gaps between when the order is placed and when it’s ready. A common setup is 15–20 minutes for pickup and 30–45 minutes for delivery. You can also limit how many orders fit into each time slot during busy periods. For example, capping Friday dinner at 6 orders per 30-minute window can stop the kitchen from getting buried all at once.
For tips, set FoodMaster to show preset buttons for 15%, 18%, and 20% of the pre-tax subtotal, plus a custom dollar amount field. Show the tip as a separate line item, such as Tip for staff: $4.50, so it’s clear that the tip is optional and not part of delivery fees.
For taxes, go to WooCommerce → Settings → Tax, turn taxes on, and set your store’s base address to your restaurant’s state and ZIP code. Then assign menu items to the right tax class for prepared food. Before launch, check rates with your accountant or local Department of Revenue.
Prepare checkout and kitchen workflow
Your checkout page should give customers a clear summary before they pay. Each item line should show the product name and selected modifiers. For example: Build-Your-Own Pizza – Large, Thin Crust, Extra Cheese, Pepperoni. The unit price should appear right there with it.
Under that, show separate line items for the delivery fee, tip, and sales tax. Use standard U.S. currency formatting, and make sure the Order Total stands out, like Total: $24.99 or Total: $1,299.50. Also check that WooCommerce is set to USD, with a period for decimals and a comma for thousands.
On the kitchen side, FoodMaster sends completed orders to either a kitchen display system (KDS) or a thermal printer. Supported thermal printers connect through the Windows or macOS printing app. Printed tickets should include the Order ID, customer name, phone number, selected modifiers, order notes, payment method, and the requested pickup or delivery time. That’s the info your kitchen and front-of-house team need to get the order right.
| Order Type | Required FoodMaster Settings | WooCommerce Fields | Workflow Impact |
|---|---|---|---|
| Pickup | Lead time (e.g., 20 min), pickup hours | Name, Phone, Email | Reduces lobby crowding; customer collects at counter at a set time |
| Delivery | Distance radius (miles) or ZIP codes, fees, minimum order amount | Street, City, State, ZIP | Requires driver dispatch; fees applied based on distance zone |
| Dine-In | QR table numbers, table count | Table number (auto-filled via QR) | Orders tagged with table ID; no address or driver needed |
Before you go live, place a test order for each fulfillment type with Stripe’s test mode. Check that the confirmation email, KDS or printer output, and checkout screen all show modifiers and totals the right way. Next, tighten the mobile flow and run one final test order.
sbb-itb-7e654f7
Improve Mobile Ordering and Launch the System
Improve the mobile ordering flow
With the menu and checkout in place, the next step is to tighten the phone experience before launch. The aim is simple: fewer taps between browsing and paying.
Start with a single-column menu layout. FoodMaster supports accordion-style categories that collapse and expand on tap, which is a good fit for larger menus. Keep category names short and easy to scan – Appetizers, Entrees, Burgers, Drinks – so they sit cleanly on small screens. Stick to six to eight main categories, then move seasonal or niche items farther down the page.
Button size matters more than people think on mobile. Use 44–48 px buttons, 16–18 px descriptions, and 18–20 px prices. For items with required choices like size, protein, or sauce, set up FoodMaster’s add-ons so they open in one scrollable modal instead of sending the customer to another page. Show each add-on price right next to the option, such as +$1.50. That way, there are no surprises.
On the checkout side, cut the form down to what you actually need. For pickup, ask for first name, last name, mobile phone, email, and an optional notes field. For delivery, collect street address, apartment or unit, city, state with a two-letter dropdown, and ZIP code. Remove company fields and any billing fields you don’t use. Place Subtotal, Sales Tax, Delivery Fee, Tip, and Order Total directly above Place Order so customers can review the full amount at a glance.
For speed, compress images to WebP, keep page weight under 2–3 MB, and lazy-load anything below the fold.
Run a full test order before launch
Once the mobile flow feels smooth, run a full test order on one iPhone and one Android phone over cellular data. Don’t stop at a desktop browser set to mobile width. That’s not the same thing.
- Browse every category and confirm labels, images, and buttons work correctly on a small screen.
- Customize a popular item with multiple add-ons, add several items to the cart, and verify quantities update cleanly.
- Switch between pickup and delivery, enter realistic U.S. address and contact details, and confirm taxes, delivery fee, and tip all update correctly.
- Pay using Stripe’s test mode and verify the confirmation page loads quickly.
- Check that the confirmation email and kitchen ticket both show the correct items, modifiers, totals, and estimated pickup or delivery time.
If something feels clunky during testing, customers will feel it too. Fix those issues first, then publish the ordering system.
Conclusion: Launch a Working WordPress Restaurant Ordering System
The goal is a simple menu customers can use fast and staff can manage without extra training. With WooCommerce and FoodMaster set up, your menu built, fulfillment rules in place, and the mobile flow tested on real devices, you have a working WordPress restaurant ordering system ready to take orders.
Create a Restaurant Online Ordering System with WordPress & WooCommerce
FAQs
What WordPress hosting setup do I need first?
Use a self-hosted WordPress.org installation. WordPress.com puts limits on the plugins and themes you’ll need for restaurant ordering.
Pick a hosting provider that supports PHP 8.0+, includes free SSL, and offers automatic backups. A lot of hosts also give you one-click WordPress setup, which makes the first step much easier.
After your site is live, set your WordPress timezone to match your restaurant’s location. That small setting matters more than people think, since it affects order timing and scheduling.
How should I choose between simple, variable, and add-on products?
Choose the product type based on how much customization the item needs:
- Simple Product: a fixed item with no customization
- Variable Product: separate versions with different prices, like a small, medium, or large pizza
- Extra Options: toppings, sauces, or other add-ons
This setup keeps your menu easier to manage and makes ordering clean and mobile-friendly.
What should I test before taking real online orders?
Before you launch, test the full ordering flow on mobile. Check that the menu layout feels easy to use, touch targets are large enough to tap without frustration, and the cart works without hiccups.
Then place test orders for delivery, pickup, and dine-in. This helps you confirm that time slots, delivery fees, and minimum order amounts are set up the way you expect.
You’ll also want to make sure staff notifications come through, thermal printing works, and orders show up correctly in your WooCommerce dashboard or kitchen display system.
Related Blog Posts
Commission-free ordering
Run restaurant orders on your own WordPress site
FoodMaster adds delivery, pickup, dine-in, POS, and kitchen tools — with zero per-order fees.