
On this page
- Free Multi Location Product & Inventory Management for WooCommerce Plugin
- Choose the right branch structure
- Shared catalog for chain-wide core items
- Separate branch menus for local differences
- Mixed setup: one master catalog with branch visibility rules
- Set up branch records and branch pages
- Add each branch with address, phone, hours, and service area
- Assign products to all branches or selected branches only
- Create a dedicated page for every branch
- Configure branch menus, checkout rules, and stock
- Show the right menu and fulfillment options per branch
- Apply location-based checkout validation
- Track stock by branch and avoid overselling
- Route orders to the correct branch and complete the setup
- Use branch selection to route orders automatically
- Final launch checklist
- FAQs
- How should customers pick a branch first?
- When should I use a shared menu or separate branch menus?
- How do I stop orders from going to the wrong branch?
- Related Blog Posts
If branch selection happens after the menu loads, orders can go to the wrong store. I’d set the branch first, then tie menu visibility, delivery rules, checkout checks, stock, and order routing to that one choice.
Here’s the short version: a chain with 2+ locations needs one clean branch system. I’d use one WooCommerce store when locations share branding and most menu items, then control each branch with its own hours, ZIP codes, fulfillment methods, item access, and stock counts. That cuts admin work while keeping each store’s ordering flow separate.
What this setup needs to cover:
- Branch structure: shared catalog, separate menus, or a mixed model
- Branch records: address, phone, hours, service area, and fulfillment options
- Branch pages: one page per location with a direct Order Online path
- Menu filtering: show only items sold at the selected branch
- Checkout rules: block out-of-zone delivery, enforce minimums like $20.00, and limit payment methods by branch
- Stock by branch: one item can be in many stores, but inventory must stay separate
- Order routing: send each order, ticket, and alert to the branch filling it
A few numbers from the setup itself show why this matters: one branch may deliver only to 94103 and 94107, another may run split hours like 11:00 AM–3:00 PM and 5:00 PM–9:00 PM, and another may stay open until 2:00 AM. That means one store-wide rule won’t work.
If I were setting this up, I’d keep one simple rule: <u>the selected branch becomes the customer’s store for the full session</u>. Everything else should follow from that.
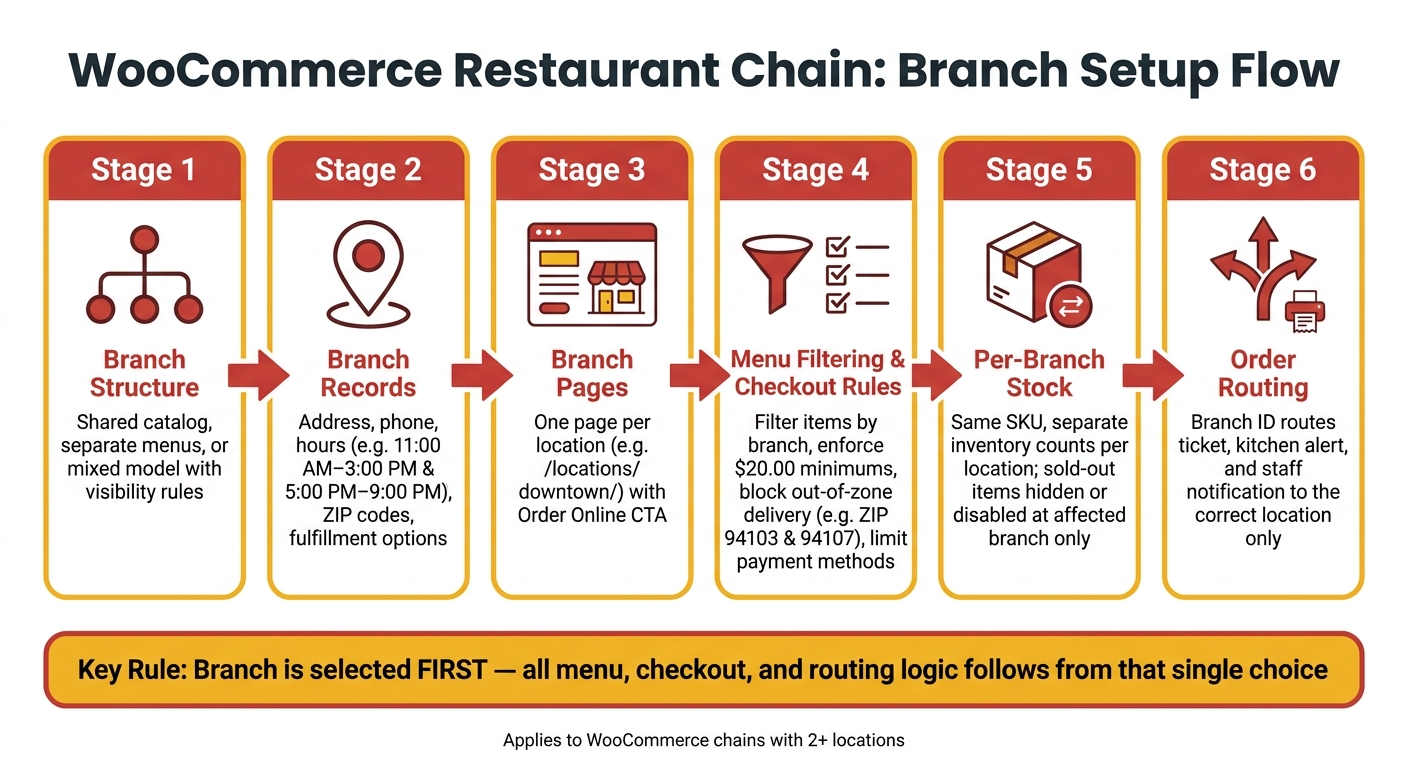
WooCommerce Restaurant Chain: Branch Setup Flow
Free Multi Location Product & Inventory Management for WooCommerce Plugin
sbb-itb-7e654f7
Choose the right branch structure
Once customers pick a branch, your product setup decides what they can see and order. The big choice is simple: how much do your branches share the same menu? If most items are the same across locations, a central setup cuts a lot of extra work.
Pick the model that fits your menu overlap, then add branch-level rules only where they matter.
Shared catalog for chain-wide core items
A shared catalog gives you one product record per item. Change the price, update the description, or swap the photo once, and it updates everywhere.
This setup works best when branches are mostly the same and only differ around the edges. Maybe one location needs to hide an item during certain hours. Maybe another runs out of a seasonal drink. In cases like that, you can add availability rules on top of the shared product instead of making separate copies for each branch.
Separate branch menus for local differences
Separate branch menus fit stores that run in very different ways. A college-town branch that stays open until 2:00 AM and sells student combo deals may have little in common with a family-suburb location that closes at 9:00 PM.
Branches in different states can also face different legal rules, such as alcohol sales, local tax settings, or region-specific items. Those cases are often easier to handle when each branch controls its own product set.
The downside? There’s more hands-on work for each branch. Every price update, new item, and description change has to be made one by one.
If that feels like too much, a mixed setup usually hits the sweet spot.
Mixed setup: one master catalog with branch visibility rules
A mixed setup keeps one master catalog for core items, then uses branch visibility rules to decide what each location shows. A local category or branch-only item can still live in the master catalog but appear only when the customer selects the matching branch.
In WooCommerce, this often works with a branch tag or location field tied to each product. That field marks which branches can sell it. A plugin like FoodMaster – Restaurant Ordering Plugin can use the customer’s branch choice to filter the menu on its own, so people only see items their selected location actually carries.
That means you don’t have to duplicate the whole catalog, but each branch menu still stays accurate.
Set up branch records and branch pages
Once you’ve picked your branch setup, add each location as a branch record in WooCommerce. Then let each branch page pull from that record instead of repeating the same details by hand. That keeps things cleaner and helps control menu visibility and checkout rules from one place.
Add each branch with address, phone, hours, and service area
Each branch record should include the branch name, full street address, local phone number, opening hours, and pickup, delivery, and dine-in options. Use U.S. address formatting, 12-hour time, and miles for delivery zones.
If a branch uses split shifts, list each block on its own. For example: 11:00 AM–3:00 PM and 5:00 PM–9:00 PM.
You can define the delivery area in a few ways:
- A radius in miles
- ZIP codes
- A custom-drawn zone
These fields make checkout validation by location much easier. They also help show the right service options for each branch.
FoodMaster – Restaurant Ordering Plugin can store each branch as its own location record with separate hours, delivery rules, and fulfillment settings.
Assign products to all branches or selected branches only
Not every item in your main catalog belongs at every location. Some items are chain-wide. Others are branch-only.
Use branch tags or a location field to assign products to all branches or only to selected ones. Then, after a customer picks a branch, use that choice to filter the catalog so they only see what’s available there. In plain English: no dead-end clicks, no items that can’t be ordered from that store.
Create a dedicated page for every branch
Once the branch record is in place, publish a page for that location. This gives customers a clear starting point for ordering from that branch.
Every branch page should use the same layout so the experience stays consistent from one location to the next. But the branch-level details should stay specific to that page: full address, phone number, hours, delivery area, available fulfillment methods, and an "Order Online" button that opens that branch’s ordering flow.
A steady URL pattern like /locations/downtown-columbus/ or /locations/midtown/ keeps navigation simple as more branches are added.
If two branches are in the same city, add a neighborhood name or landmark to the page title so customers can tell them apart fast. The page should open the correct branch ordering path right away. From there, it should connect straight into menu filtering, checkout validation, and order routing.
Configure branch menus, checkout rules, and stock
Once you handle multiple restaurant locations and set up your branch records, the next step is simple: use the customer’s branch choice to control what they can order and how they can check out.
That branch selection should be saved in the session and used to filter products, categories, fulfillment options, fees, and time slots. In plain English, the site should behave like that branch is now the customer’s store.
Show the right menu and fulfillment options per branch
When a customer picks a branch, that choice needs to stick for the rest of the session and shape what they see.
So if Downtown offers pickup and delivery only, the store should show only those fulfillment choices. It should also apply Downtown’s $20.00 minimum order and limit delivery to ZIP codes 94103 and 94107.
A small but important setup detail: load the branch before the cart. That way, products, fees, and fulfillment rules all follow the selected location from the start. If you load the cart first, things can get messy fast.
It also helps to keep the category layout the same across every branch. Use the same top-level structure, such as:
- Starters
- Mains
- Desserts
- Drinks
Then change only the items inside those categories by branch. That keeps the ordering flow familiar no matter which location the customer chooses.
Those same branch rules should carry into checkout too.
Apply location-based checkout validation
Checkout validation stops bad orders before they go through. And when you run more than one location, those checks should come from the selected branch.
That usually means blocking out-of-zone delivery, enforcing branch minimums, hiding payment methods a branch doesn’t support, and stopping orders that come in too late.
For example, a suburban branch may allow cash for pickup, while a downtown delivery-only branch does not. In that case, “pay at the counter” shouldn’t show up for the downtown branch at all.
| Rule | Example | How It’s Enforced |
|---|---|---|
| Delivery zone | ZIP codes 94103 and 94107 for Downtown | Shipping zone config; blocks checkout if address is out of range |
| Minimum order | $20.00 for Downtown | woocommerce_checkout_process hook per branch |
| Cutoff time | Same-day orders must be placed by 10:30 PM | Branch schedule check against current server time |
| Available time slots | 11:30 AM–2:00 PM and 5:00 PM–9:30 PM | Time-slot selector tied to branch operating hours |
| Payment methods | Card + Apple Pay at Downtown; card + cash at Suburban | woocommerce_available_payment_gateways filter by branch ID |
If you want a plugin-led setup, FoodMaster – Restaurant Ordering Plugin can handle branch selectors, menu filtering, ZIP-based delivery zones, time slots, and per-location checkout rules.
Track stock by branch and avoid overselling
Stock needs to be tracked by branch, even when branches share the same catalog item.
Take a Cheeseburger. It may use one SKU across the business, but Downtown and Suburban still need their own quantity counts. When an order is placed, the system should reduce stock only for the branch that’s filling that order.
| Scenario | How It’s Handled | Result |
|---|---|---|
| Shared catalog item | Global product tagged to multiple branches | Appears on all menus; stock tracked per branch |
| Branch-exclusive item | Product tagged to one location only | Only visible when that branch is selected |
| Temporary sellout | Manager toggles "Sold out" for their branch | Item stays in catalog but is unorderable at that location |
| Order placed | Stock decremented from the fulfilling branch only | Other branches unaffected |
If a branch runs out of an item, you have two clean options. The item can disappear from that branch’s menu, or it can stay visible with a clear "Sold out at this location" label and a disabled add-to-cart button.
Route orders to the correct branch and complete the setup
Use branch selection to route orders automatically
Once checkout validation is done, use the selected branch ID to send the order to the right place. That means the right ticket gets printed, the right team gets notified, and the right kitchen starts working on it.
Start with branch selection and location management as the main routing rule. For delivery orders, auto-assign the branch by ZIP code and delivery zones. If delivery zones overlap, use one fixed tie-break rule every time, such as the nearest open branch. And if the cart includes a branch-only item, either lock the order to that branch or stop checkout.
That same branch ID should control every alert and print job after checkout. Send the order only to that branch’s kitchen, printer, and staff dashboard. Other locations shouldn’t see it at all.
Final launch checklist
Before you go live, test the full setup path in order. Each part relies on the one before it, so if something is off early, the problems tend to snowball later.
| Step | What to verify |
|---|---|
| Branch records | Complete contact, hours, time zone, and zone data for every location |
| Menu assignments | Shared items are tagged chain-wide; branch-exclusive items are restricted to the correct locations |
| Branch pages | Each page shows accurate hours, contact details, and a clear call to action for ordering |
| Checkout rules | Fulfillment methods, fees, taxes, tips, minimums, and time slots match each branch |
| Stock tracking | Per-branch inventory is active; sold-out items are hidden or disabled at the affected location only |
| Order routing | Test orders for pickup, delivery, and branch-restricted items all land at the correct branch |
The routing tests matter most. Use addresses near the edge of each delivery zone. Try items that belong to only one branch. Then check that every notice reaches the right kitchen, not just the right inbox.
If you want a plugin-led path through this checklist, FoodMaster – Restaurant Ordering Plugin is built to support branch-aware routing and fulfillment logic for WooCommerce restaurant chains.
FAQs
How should customers pick a branch first?
Customers should pick a branch right at the start of the ordering process. That way, the site can show the correct menu, pricing, and delivery rules for that location.
With FoodMaster, this usually happens through a front-end location selector. It saves the customer’s choice in a session cookie or a URL parameter, so the site knows which branch to use as they move through the order flow.
For table ordering, a branch-specific QR code can set the branch automatically. For delivery, the system can send customers to the nearest store based on their address.
When should I use a shared menu or separate branch menus?
Use a shared menu when most branches sell the same items at the same prices. It’s a good fit for two to five locations and makes day-to-day management simpler because you only need to maintain one catalog for all stores.
Use separate branch menus when each location needs its own setup. That includes things like unique items, local pricing, different hours, tax rates, or delivery rules. This setup often makes more sense for larger chains or franchise groups where branches run more independently.
How do I stop orders from going to the wrong branch?
FoodMaster helps stop that problem by sending each order to the nearest branch based on the customer’s location.
If you want more control, you can ask customers to pick their branch themselves through a header dropdown, a popup modal, or a dedicated landing page.
That selection is then stored in a session or cookie during checkout, so the right branch stays tied to the order. You can also set branch-specific delivery zones by distance, ZIP code, or custom map polygons to block orders that fall outside the delivery area.
Related Blog Posts
Commission-free ordering
Run restaurant orders on your own WordPress site
FoodMaster adds delivery, pickup, dine-in, POS, and kitchen tools — with zero per-order fees.