On this page
- Set Up WordPress, WooCommerce, and FoodMaster
- Install WordPress and Configure WooCommerce Basics
- Activate FoodMaster and Choose the Order Page Layout
- Check Theme Compatibility and Mobile Responsiveness
- Build the Menu and Checkout Experience
- Create Menu Categories and Food Items
- Add Sizes, Toppings, and Other Product Options
- Set Up Checkout Fields, Tips, and Order Totals
- Configure Payments, Fulfillment, and Order Management
- Enable Payments for U.S. Orders
- Set Delivery Zones, Pickup Options, and Time Slots
- Manage Notifications, Printing, and Order Statuses
- Test, Optimize, and Launch
- Test the Full Ordering Flow on Mobile and Desktop
- Improve Speed, Accuracy, and Peak-Hour Reliability
- Conclusion: The Key Steps to a Working Restaurant Ordering System
- Create a Restaurant Online Ordering System with WordPress & WooCommerce
- FAQs
- How much does it cost to build this setup?
- Can I use this for one location or multiple locations?
- What should I launch first if my menu is large?
- Related Blog Posts
If online ordering takes more than a few taps, people leave. I’d build this type of system with three parts: WordPress for the site, WooCommerce for products and checkout, and FoodMaster for restaurant-only tools like menu layouts, add-ons, delivery zones, and time slots.
Here’s the short version:
- I use WordPress to run the site, pages, and branding.
- I use WooCommerce to handle the cart, checkout, tax, and payments.
- I use FoodMaster to add food ordering features like toppings, pickup, delivery, preorder times, and kitchen tickets.
- I keep the checkout short: name, phone, email, order type, address if needed, and notes.
- I set up Stripe or PayPal, plus Apple Pay and Google Pay when available.
- I build delivery zones by ZIP code, city, or neighborhood.
- I test the full flow on desktop, iPhone, and Android before launch.
- I watch performance too: if TTFB is over 600 ms, the site may struggle during dinner rush.
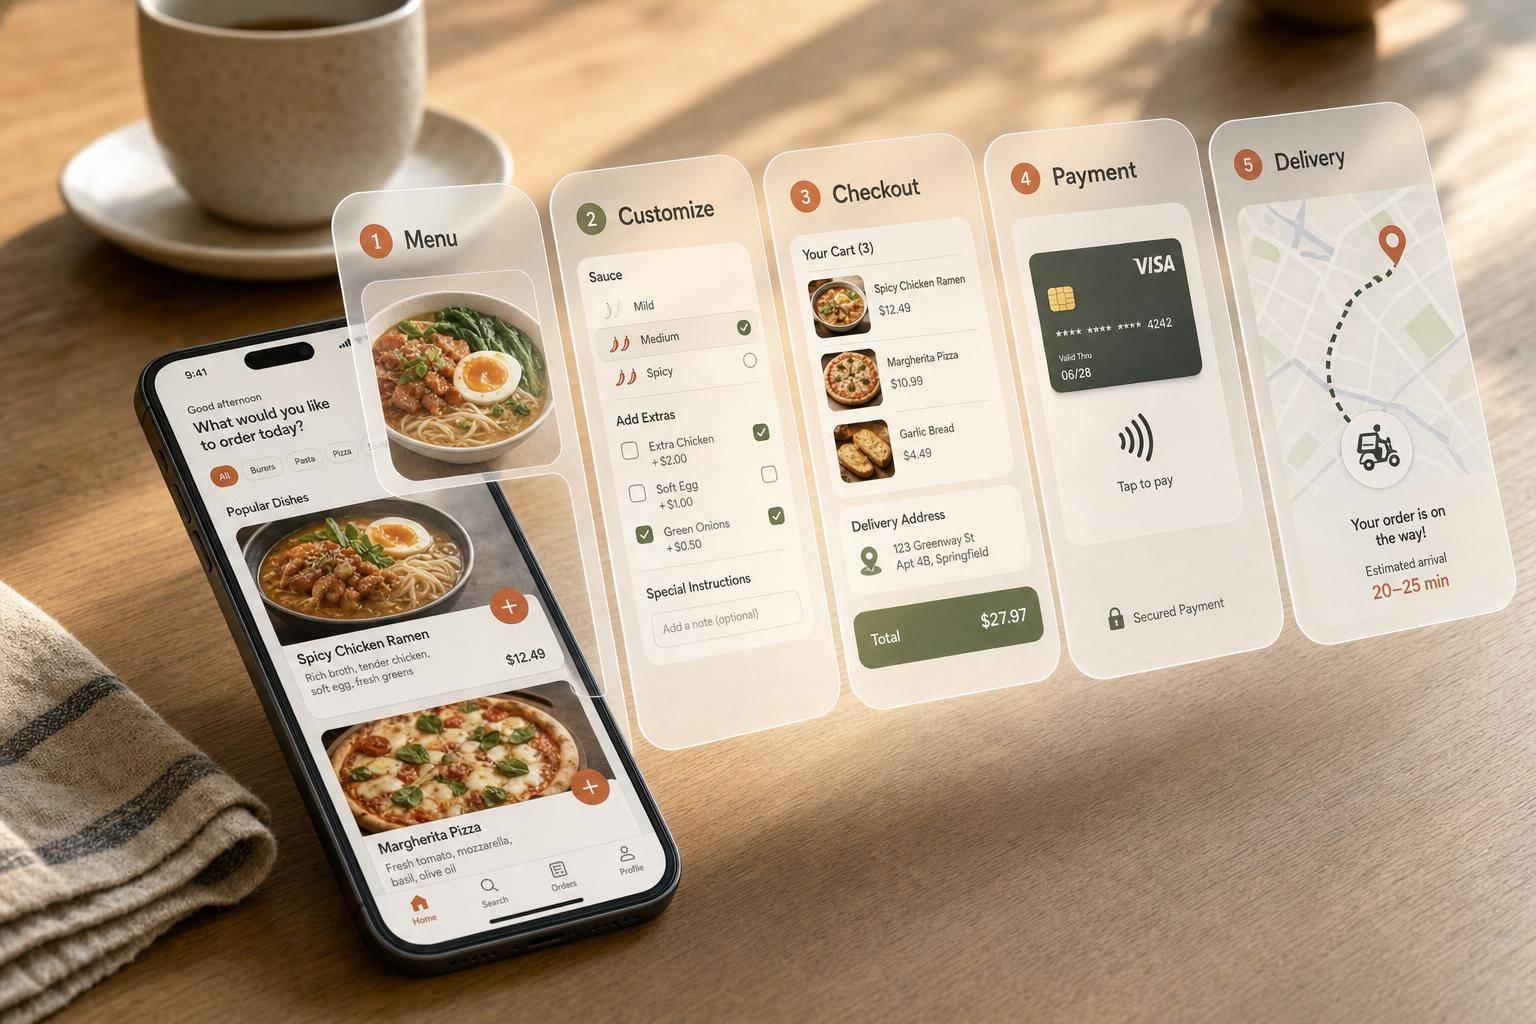
A working restaurant ordering system is not just a menu page. It needs a full path from browsing to payment to kitchen handoff. That means clear categories, simple item options, correct tax in USD, pickup and delivery time slots, order alerts, and a checkout that does not slow people down.
What matters most? In my view, it comes down to five things:
- A mobile-first menu
- Simple item customizations
- Short checkout fields
- Payment and fulfillment rules that match your store
- Full testing before launch
If I were setting this up today, I’d treat the whole system like one connected order flow, not a pile of plugins.
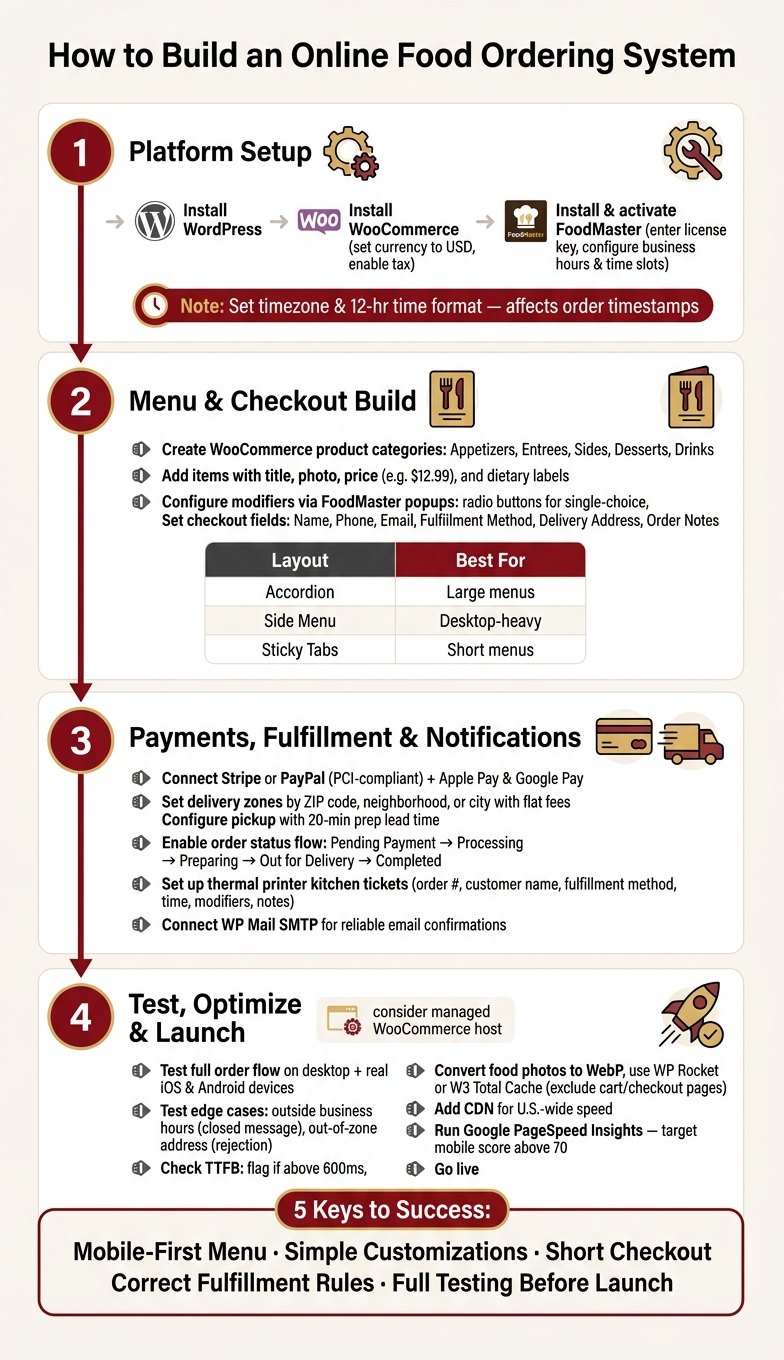
How to Build an Online Food Ordering System: End-to-End Setup Flow
Set Up WordPress, WooCommerce, and FoodMaster

Install WordPress and Configure WooCommerce Basics
Start with a hosting provider that offers one-click WordPress installation and SSL. Install WordPress, then head to Settings → General and set your site timezone, date format, and 12-hour time format. Those settings affect order timestamps and scheduled delivery slots, so it’s worth getting them right from the start.
Next, install WooCommerce through Plugins → Add New, activate it, and run the setup wizard. Set your store address to your restaurant’s U.S. location, choose United States as the store country, and set the currency to U.S. Dollar (USD) so prices show up as $12.99. Let WooCommerce create its core store pages for you. After that, turn on tax settings for your state under WooCommerce → Settings → Tax.
Activate FoodMaster and Choose the Order Page Layout
Upload the FoodMaster ZIP file, install it, activate it, and enter your license key under FoodMaster → Settings → License. Then use the setup wizard to set your restaurant type, business hours, fulfillment methods, fees, preorder rules, and 15- or 30-minute time slots. Create an Order Online page and add the FoodMaster block or shortcode.
FoodMaster gives you three layout options for the order page:
| Layout | Best For | Key Behavior |
|---|---|---|
| Accordion | Large menus | Categories collapse to reduce scrolling |
| Side Menu | Desktop-heavy menus | Fixed vertical category list beside items |
| Sticky Tabs | Short menus | Horizontal tabs stay pinned while scrolling |
Pick the one that fits the way your customers move through the menu. If you have a big menu, Accordion can cut down on scrolling. If most of your customers order on desktop, Side Menu may feel easier to use. For shorter menus, Sticky Tabs keeps things simple and easy to scan.
Check Theme Compatibility and Mobile Responsiveness
FoodMaster works with WooCommerce-compatible themes, but the bundled FoodMaster Modern Theme is the fastest way to get a clean launch. If you plan to keep your current theme, test it carefully. Make sure the order page displays cleanly, with no header overlap and no cart errors.
Then test the page on actual iOS and Android devices. That part matters more than people think. Buttons should be easy to tap, text should be easy to read, and checkout should not force users to scroll sideways. Also, keep the mobile page fast before loading it up with menu items.
Once the order page feels smooth on mobile, you’re ready to set up menus and checkout fields.
sbb-itb-7e654f7
Build the Menu and Checkout Experience
Create Menu Categories and Food Items
Once the order page is live, the next job is simple: fill it with menu items and make checkout easy to finish.
Start with WooCommerce product categories that match the way people read a restaurant menu. Good starting points include Appetizers, Entrees, Sides, Desserts, and Drinks. If the menu gets long, split Entrees into smaller groups like Burgers, Pastas, or Salads. That way, customers can find what they want without scrolling forever. The goal is to keep each category small enough to scan fast.
For each item, focus on the details that help someone make a quick choice. Use a clear product title, like "Chicken Caesar Wrap" instead of an internal kitchen code. Add a short description, a clear photo, and a visible price like $12.99. You should also include dietary labels such as vegan, gluten-free, or spicy right on the product card so people can spot them right away.
Add Sizes, Toppings, and Other Product Options
Use simple products for fixed-price items. Use variable products when the size or another choice changes the price. But don’t turn every tiny customization into its own variation. That gets messy fast.
For toppings, sauces, and other modifiers, FoodMaster shows add-ons in a popup, so customers can customize their order without leaving the menu. That small detail matters. It keeps the flow smooth, especially on mobile.
Group modifiers in the order customers expect to see them:
- Size
- Protein or base choice
- Toppings
- A short special instructions field
Use radio buttons for single-choice options like crust type or spice level. Use checkboxes for multi-select options like extra cheese (+$1.50), bacon, or avocado. Keep the modifier list tight and stick to the options people order most often. More choice isn’t always better. In food ordering, too many options can slow people down.
Set Up Checkout Fields, Tips, and Order Totals
Restaurant checkout should be much shorter than a standard ecommerce checkout. Ask only for the details needed to complete the order: name, phone, email, fulfillment method, delivery address, and order notes. If a field doesn’t affect fulfillment, cut it.
FoodMaster changes the checkout form based on the customer’s fulfillment choice, so delivery customers see the address field while pickup customers don’t. For tips, a tipping selector with preset percentages and a custom amount fits what U.S. customers usually expect. Before Place Order, the order summary should clearly show the item subtotal, add-on charges, delivery fee, sales tax, tip, and the final total in USD.
With the menu and checkout set up, the next step is connecting payments, delivery rules, and order handling.
Configure Payments, Fulfillment, and Order Management
Enable Payments for U.S. Orders
Once your checkout totals are set, connect your payment methods to the order flow. A simple setup works best here: use one card gateway and one digital wallet. Wallet payments can help cut checkout drop-off, which matters a lot when someone’s ordering food and wants to finish fast.
Use a PCI-compliant gateway like Stripe or PayPal, and add Apple Pay and Google Pay where they’re supported. Keep tips and delivery fees as separate line items so customers can see the full total clearly before payment is captured. Before you go live, run a sandbox test order to make sure payment receipts, order statuses, and customer notifications all update the way they should.
If you also want to take cash for local orders, turn on Cash on Delivery in WooCommerce → Settings → Payments → Take offline payments. It’s smart to limit cash to local orders only. That makes change and reconciliation much easier.
Set Delivery Zones, Pickup Options, and Time Slots
Your delivery zones should match what your kitchen and drivers can actually handle. In WooCommerce → Settings → Shipping → Shipping zones, create zones by ZIP code, neighborhood, or city, then attach flat delivery fees based on distance and cost.
FoodMaster’s delivery settings let you pick the zone type, set minimum order amounts, define estimated delivery time, and set delivery hours so customers only see windows your kitchen can manage. That matters more than it sounds. If your store shows time slots you can’t keep, frustration shows up fast.
For pickup, use Local Pickup with counter payment if you accept pay-on-pickup orders. Set a realistic prep lead time, such as 20 minutes, so the pickup window lines up with kitchen capacity.
Manage Notifications, Printing, and Order Statuses
Order confirmations need to go out fast. Keep customer email confirmations turned on, and make sure admin alerts go to an inbox your team actually watches during service hours. To help with deliverability, connect WordPress mail to a transactional service with WP Mail SMTP so order emails are less likely to end up in spam.
On the staff side, FoodMaster can automatically print new orders to a thermal printer through its desktop app, which turns each online order into a kitchen ticket right away. The ticket should include:
- Order number
- Customer name
- Fulfillment method
- Delivery or pickup time
- Item modifiers
- Special notes
For order management, map WooCommerce statuses to how the kitchen works in real life: Pending payment → Processing → Preparing → Out for Delivery → Completed. FoodMaster’s restaurant-specific status labels help the cashier, kitchen, and delivery team stay on the same page.
After payments, delivery rules, and alerts are set up, test the full ordering flow on mobile and desktop.
Test, Optimize, and Launch
Test the Full Ordering Flow on Mobile and Desktop
With payments, delivery rules, and notifications set up, check the full customer journey before launch.
Before you go live, place complete test orders for both pickup and delivery on a desktop browser and on a real mobile device. Responsive mode in a browser helps, but it doesn’t tell the whole story. If you can, test on actual iOS and Android phones so you can spot tap, layout, and scrolling problems early.
Go through the entire flow every time. Browse categories, open an item, pick a size or topping, add it to the cart, and make sure totals update correctly in USD, with tax and delivery fees listed separately. Test the exact pickup, delivery, time-slot, tax, and payment settings you set in FoodMaster and WooCommerce. Then move through checkout, choose a time slot, and complete a sandbox payment with Stripe or PayPal. After the order is placed, confirm that the customer email or SMS arrives with the correct U.S. date and time format, such as July 14, 2026, 6:30 PM, and that the order shows up in the FoodMaster dashboard with the right status and item details.
On real iOS and Android devices, check tap targets closely. Buttons should be easy to press, and checkout should scroll straight down without any horizontal overflow.
Don’t stop at the happy path. Try ordering outside your set business hours to confirm the site shows a closed message. Enter an address outside your delivery zone too, and make sure the system rejects it cleanly. Those little tests can save you from big headaches later.
Improve Speed, Accuracy, and Peak-Hour Reliability
Once the flow works, see how the site holds up during dinner-rush traffic.
A site that feels fast at 2:00 AM can fall apart at 7:00 PM. Start with hosting. If your Time to First Byte (TTFB) is above 600 ms, it may be worth moving to a managed WooCommerce host before launch.
Keep food photos lean by converting them to WebP and trimming file sizes. Use a caching plugin like WP Rocket or W3 Total Cache, but leave cart, checkout, and account pages out of full-page caching so the ordering flow keeps working. Add a CDN as well so static files load fast for customers across the U.S.
Accuracy matters just as much as speed. Make every required modifier – pizza size, spice level, protein choice – mandatory so customers can’t skip it. Then review a kitchen ticket and make sure item names, options, and quantities match what your kitchen staff needs to see. Run Google PageSpeed Insights and aim for a mobile score above 70 before launch.
Conclusion: The Key Steps to a Working Restaurant Ordering System
After the system clears testing and performance checks, a dependable online ordering setup comes down to five connected choices. Start with WordPress and WooCommerce as the base. They handle products, payments, and order tracking right away. Then add FoodMaster to shape that base into something built for restaurants: category menus, item customizations, and a mobile-ready layout customers can use without friction.
Next, build a clean menu with clear options like sizes, toppings, and add-ons. Set up checkout with tipping, correct taxes, and visible fees. Define delivery zones and pickup time slots that fit what your kitchen can actually handle. Connect staff notifications and order status flows so your team knows what came in and when it needs attention.
Last, test everything before launch, including the edge cases. Tune the site for speed and dinner-rush traffic. Give your staff a simple one-page guide that shows how orders move through FoodMaster. The goal is simple: make FoodMaster and WooCommerce match the way your restaurant runs day to day.
Create a Restaurant Online Ordering System with WordPress & WooCommerce
FAQs
How much does it cost to build this setup?
Building your own restaurant ordering system can save money because it cuts out the 15%–30% fees that third-party delivery apps often take from every order.
The usual costs are pretty straightforward. You’ll need a domain name, which usually runs $10–$15 per year, plus WordPress-friendly hosting at about $3–$12 per month.
From there, the main software cost is the FoodMaster plugin, priced at $499 as a one-time payment for a lifetime unlimited website license.
If you want SMS alerts, Twilio is an optional add-on. Pricing starts at $1 per month for a phone number, plus about $0.0079 for each message sent.
Can I use this for one location or multiple locations?
Yes. FoodMaster works for both single-location restaurants and multi-location franchises.
If you run more than one branch, you can manage them all from one WordPress site. At the same time, each location can have its own menu, operating hours, and delivery zones.
That means one central setup for your team, without forcing every store into the same box.
FoodMaster can also route customers to the nearest store based on their location, which helps keep ordering simple and cuts down on mix-ups.
What should I launch first if my menu is large?
If your menu is large, start with the plugin’s demo content. It gives you a basic menu fast, so you can import categories, items, and images first, then go back and update each item’s price and description over time.
For a better user experience, keep your categories short and clear. Then use navigation layouts like accordions or side menus so people can browse without getting lost.
Related Blog Posts
Commission-free ordering
Run restaurant orders on your own WordPress site
FoodMaster adds delivery, pickup, dine-in, POS, and kitchen tools — with zero per-order fees.