On this page
- Set up standard customer fields in WooCommerce
- Make name, phone, and email required
- Use U.S. address fields only when needed
- Edit field labels, order, and required status
- Configure pickup and delivery fields without slowing checkout
- Add a pickup or delivery selector
- Show delivery address fields only for delivery orders
- Capture pickup and delivery timing details
- Add restaurant-specific fields for order notes and access details
- Use order notes for food instructions and delivery comments
- Add separate fields for table number, gate code, or location
- Check how fields appear in orders and keep the setup reliable
- Review customer fields in the WooCommerce order screen
- Keep only the fields that support fulfillment
- FAQs
- How do I hide address fields for pickup orders?
- What checkout fields should be required for restaurant orders?
- How should I collect pickup and delivery times?
- Related Blog Posts
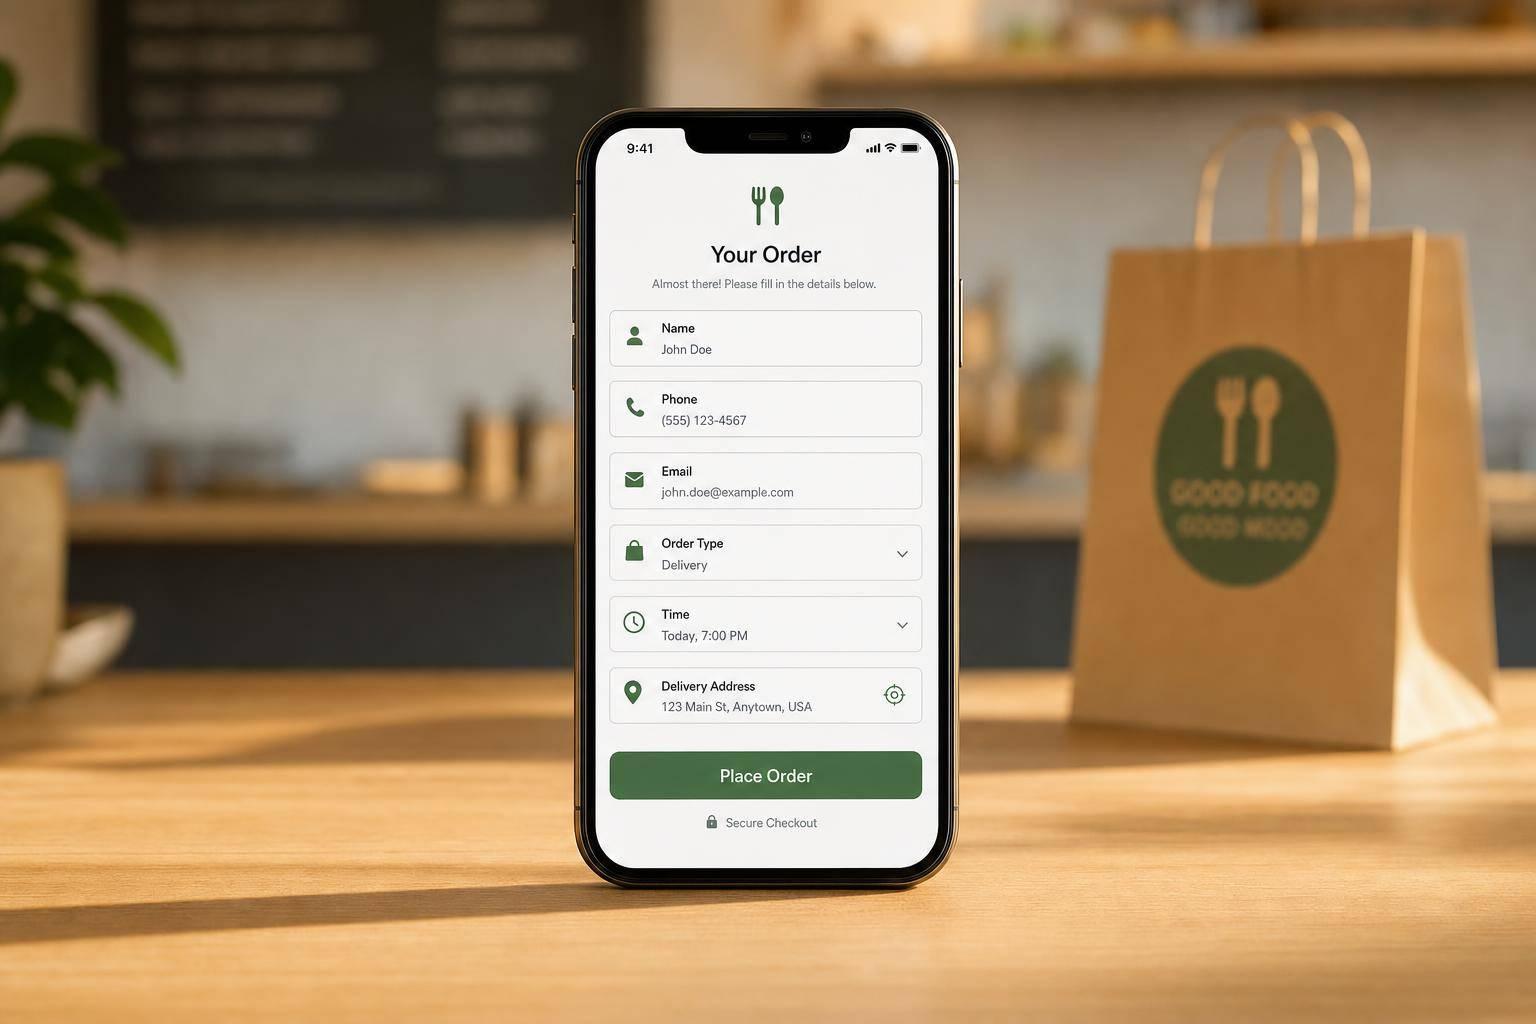
Most restaurant checkouts ask for too much. For food orders, I’d keep it simple: name, phone, email, order type, timing, and address only for delivery.
If I were setting up a WooCommerce restaurant checkout, I’d focus on what staff need to make and hand off the order without delays. That means:
- Require first name, last name, phone, and email
- Show delivery address fields only when the customer picks Delivery
- Add a clear Pickup / Delivery choice near the top
- Collect timing details in U.S. date and time format: MM/DD/YYYY and 12-hour time with AM/PM
- Use one notes box for food instructions, allergies, or drop-off comments
- Add short extra fields like Gate Code, Suite / Apt, Curbside Spot #, or Table Number only when staff use them
- Test how every field shows in the WooCommerce order screen, emails, and on mobile
A few numbers make the case. More than 60% of food orders come from smartphones, so each extra field adds friction. And since SMS has a 98% open rate, requiring a phone number makes sense when an order needs fast follow-up.
Here’s the simple rule I’d use: if a field does not help the kitchen, front counter, or driver finish the order, remove it.
Set up standard customer fields in WooCommerce
Start with the standard customer fields WooCommerce already includes. Then trim anything the kitchen or driver doesn’t need. Out of the box, WooCommerce adds more checkout fields than most restaurant orders call for, so it makes sense to keep only the details staff need to identify the customer and complete the order.
Make name, phone, and email required
For most restaurant checkouts, first name, last name, phone, and email are the main fields to keep visible. The customer’s name helps staff match the order on the ticket. Email handles the confirmation. Phone gives the team a way to reach someone if a delivery address is incomplete, a pickup is delayed, or an order note is hard to understand.
That phone field matters even more when you look at response behavior. SMS messages have a 98% open rate, and most are read within three minutes. That’s a strong case for requiring a valid phone number. Mark name, phone, and email as required.
Use U.S. address fields only when needed
For delivery orders, use street, apartment, city, state, and ZIP fields, or set up address autocomplete to speed up the process. Hide those fields for pickup orders.
Edit field labels, order, and required status
Use labels that match how staff read orders on tickets and screens. "Phone Number" and "Suite / Apt" are easier to scan and can cut down on mistakes. WooCommerce settings or a supported field editor can control field visibility, order, labels, and required status without writing PHP.
Put name, phone, and email first. That keeps checkout moving and helps staff spot the key details right away, which is essential for a high-converting guest checkout.
Once the core customer fields are set, add pickup and delivery fields only when the order type requires them.
sbb-itb-7e654f7
Configure pickup and delivery fields without slowing checkout
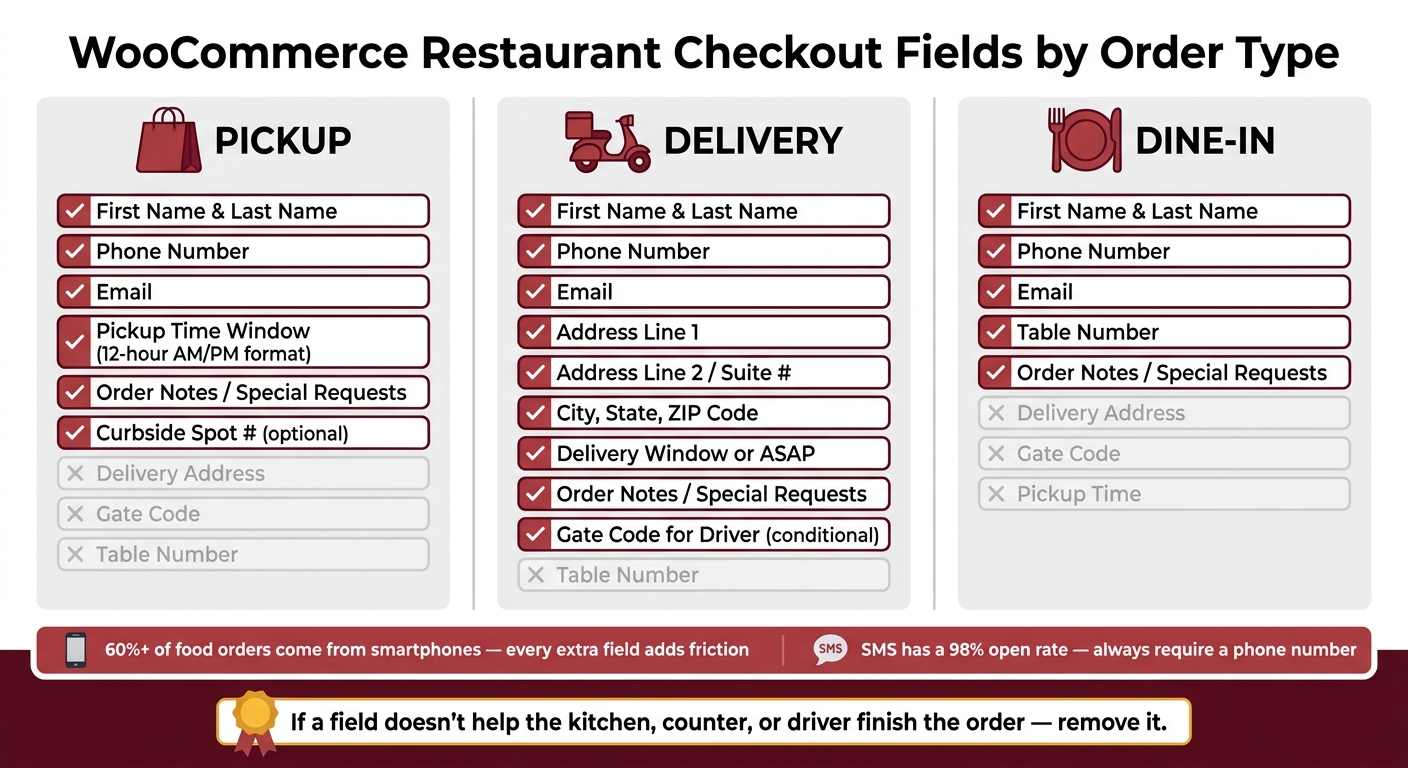
WooCommerce Restaurant Checkout Fields by Order Type
Once the main customer fields are in place, split the rest of checkout by order type. The goal is simple: show people only what they need.
Add a pickup or delivery selector
Place an order type selector near the top of checkout, right after name, phone, and email. Use radio buttons for Pickup and Delivery so both choices stay visible at the same time. That removes extra clicks and makes the path clear from the start.
Add short helper text such as Pickup at restaurant and Delivery to your address. Make this field required so the form can display the right set of fields.
Show delivery address fields only for delivery orders
Only show Address Line 1, Address Line 2, City, State, and ZIP Code for Delivery orders. If someone chooses Pickup, hide those fields completely. That keeps the form shorter and easier to move through.
Plugins like FoodMaster – Restaurant Ordering Plugin can handle this without custom code.
Capture pickup and delivery timing details
Once the order type is selected, add a timing field the kitchen can use right away: a pickup time window for Pickup orders and a delivery window or ASAP for Delivery orders.
Use U.S. date and time formats:
- month/day/year for dates
- 12-hour time with AM/PM for times
Helper text should spell out the limits in plain English, such as Pickup available between 11:00 AM and 9:00 PM. Also block past times and enforce a minimum prep window.
| Detail | Pickup | Delivery |
|---|---|---|
| Address fields | Hidden | Full address required |
| Timing | Pickup time window | Delivery window or ASAP |
Next, add order notes and access details as separate fields.
Add restaurant-specific fields for order notes and access details
Use order notes for food instructions and delivery comments
After order type and timing, add only the notes and access fields your team uses in day-to-day service. Start with one notes field for instructions staff need to see fast. Call it "Special Requests" or "Order Notes", and place it where it’s easy to spot in the WooCommerce order screen.
Use this as a free-text field for instructions that change from one order to the next, such as "no onions", "extra sauce on the side", "gluten-free bun," or "leave at the front desk." Allergy-related comments should go here too, including "allergic to shellfish – cannot have shared fryer" or "celiac, no cross-contact."
This field does a simple but big job: it gives the kitchen and front-of-house one clear place to check before the order moves out the door.
Add separate fields for table number, gate code, or location
For details that stay short and specific, use separate fields instead of stuffing everything into one notes box. That means a gate code, suite number, curbside spot, or table number should each have their own field when staff need that info in a fixed format.
A short text field labeled "Gate Code for Driver" tells staff exactly what to look for. You can do the same with "Suite #" for office deliveries, "Curbside Spot #" for pickup, and "Table Number" for dine-in orders. For dine-in orders, FoodMaster – Restaurant Ordering Plugin can set up a QR code ordering system for each table.
Use conditional logic so these fields show up only when they matter. A gate code field should appear only for delivery orders. A table number field should appear only for dine-in orders.
Keep the setup tight. If staff don’t use a field on a steady basis, leave it out. And if a field has one job, let it do that one job well. That keeps the order screen clean and easy to scan during a rush.
| Field | Order Type | Why It Helps |
|---|---|---|
| Order Notes | All | Food instructions, allergy comments, delivery preferences |
| Gate Code | Delivery | Helps drivers reach restricted addresses |
| Suite / Floor # | Delivery (business) | Directs drivers to the exact unit |
| Curbside Spot # | Pickup | Speeds up hand-off without extra back-and-forth |
| Table Number | Dine-In | Routes the order to the correct table |
Check how fields appear in orders and keep the setup reliable
Review customer fields in the WooCommerce order screen
Once your checkout fields are set up, go to WooCommerce → Orders and open a test order for each flow: pickup, delivery, and dine-in if you use it. On the single-order screen, billing details like name, phone, and email show in the Billing box near the top. The shipping or delivery address shows in a separate Shipping or Delivery Address box when needed. Order notes usually appear in the right-hand column or in a notes panel.
Different team members need different parts of that screen. Kitchen staff should look at line items and order notes for food instructions. Front-of-house staff should use the billing name and phone to confirm pickup orders. Drivers should check the shipping address, phone, and any access details together.
If a custom field doesn’t show on the order screen, place it in the admin order view next to the billing or shipping details. It also helps to check your order confirmation emails. Make sure they include the phone number, delivery address, timing, and notes, so staff can use the email as a backup record.
After you verify where each field appears, cut the checkout back to what staff need.
Keep only the fields that support fulfillment
If the order screen looks crowded, remove any field your team doesn’t use. Keep the checkout focused on the details that matter for fulfillment:
- Name
- Phone
- Delivery address for delivery orders
- A small set of extra fields, such as instructions, table numbers, or gate codes
Set the delivery address as required only when the customer picks delivery. This is a standard feature in most food delivery plugins. For pickup or dine-in, hide it with conditional logic.
Before you go live, test the full checkout on a smartphone. Make sure ZIP code and phone fields bring up the number keypad, and check that labels stay visible while the customer types.
FoodMaster – Restaurant Ordering Plugin can help keep pickup, delivery, and order-note fields organized in WooCommerce.
FAQs
How do I hide address fields for pickup orders?
Use the woocommerce_checkout_fields filter in your theme’s functions.php file to unset billing address fields on the checkout page. That gives you a simple way to remove fields like billing_address_1, billing_city, and billing_postcode for pickup orders.
The example shown removes those fields sitewide. FoodMaster can take this a step further by supporting both pickup and delivery flows while still keeping the details staff need to see, such as pickup times.
What checkout fields should be required for restaurant orders?
Ask for only the details needed to place the order and contact the customer. A phone number is always required.
- For delivery, collect the customer’s name and address
- For dine-in, collect the table number
- Include a notes or special requests field for allergies or prep instructions
How should I collect pickup and delivery times?
In FoodMaster, turn on scheduling in the plugin settings to collect pickup and delivery times at checkout. This lets customers pick the time window that works best for them instead of leaving it up to guesswork.
You can also set specific time slots, which is handy if you want tighter control over order flow during busy hours.
If you want the timing to run on autopilot, FoodMaster can calculate it for you based on product processing time. For pickup orders, you can also add a fixed lead time. The time the customer selects is then saved with the order, so it can be used in notifications or printed on kitchen receipts.
Related Blog Posts
Commission-free ordering
Run restaurant orders on your own WordPress site
FoodMaster adds delivery, pickup, dine-in, POS, and kitchen tools — with zero per-order fees.