
Connect your WooCommerce store to Hepsiburada, Turkey’s largest marketplace. Send simple and variable products to the Hepsiburada catalog, keep prices and stock in sync, and import paid Hepsiburada orders into WooCommerce automatically. This guide covers installation, every setting and the daily workflow.
Version: 1.0.0
Before you start
- WordPress 6.0 or newer, PHP 7.4 or newer, WooCommerce 3.4 or newer (tested with WordPress 7.1 and WooCommerce 11.2).
- A Hepsiburada seller account with API access.
- Your Merchant ID: the merchant ID (a GUID) Hepsiburada assigned to your store.
- Your Service key: in the Hepsiburada seller panel under Bilgilerim → Entegrasyon → Entegratörlerim.
- Your Integrator user name: the developer user name Hepsiburada created for your integration, for example
mystore_dev. - A unique SKU on every product and variation you want to sell. The plugin uses the WooCommerce SKU as the Hepsiburada merchant SKU.
- Your licence key from your wpslash.com account.
1. Install and activate
- Download the plugin zip from your wpslash.com account.
- In WordPress, go to Plugins → Add New → Upload Plugin, choose the zip and click Install Now.
- Click Activate.
- Click Activate license in the notice that appears, paste your licence key and click Activate License. The plugin starts working once the licence is active.
2. Connect to Hepsiburada
- Go to WooCommerce → Settings → Hepsiburada.
- Set Environment to Test (SIT) while Hepsiburada is reviewing your integration. Switch to Production with your production details once Hepsiburada approves it.
- Fill in Merchant ID, Service key and Integrator user name.
- Click Save changes.
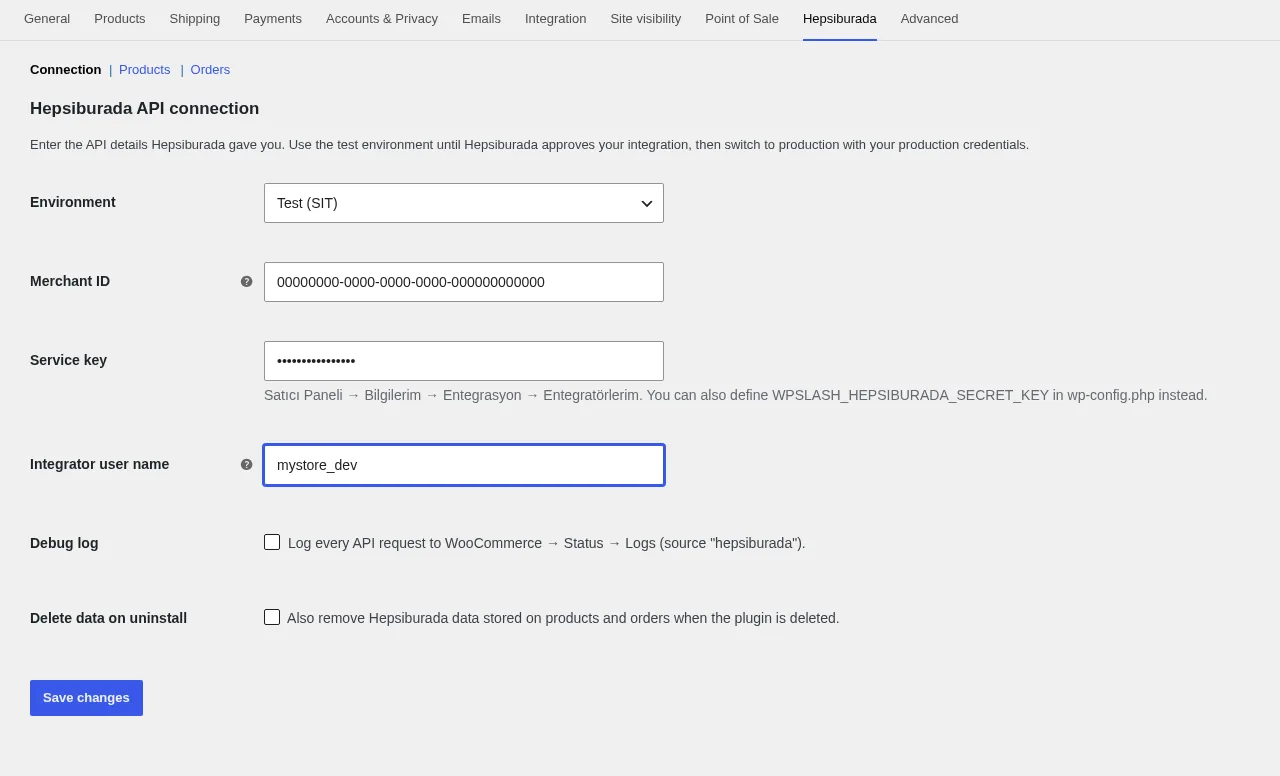
Tip: you can keep the service key out of the database by adding define( 'WPSLASH_HEPSIBURADA_SECRET_KEY', 'your-key' ); to wp-config.php. The Service key field is then ignored.
3. Test the connection and load categories
- Go to WooCommerce → Hepsiburada.
- Click Test connection. You should see “Connected to Hepsiburada.”
- Click Load categories. The plugin downloads Hepsiburada’s category list so you can search it in the product editor.
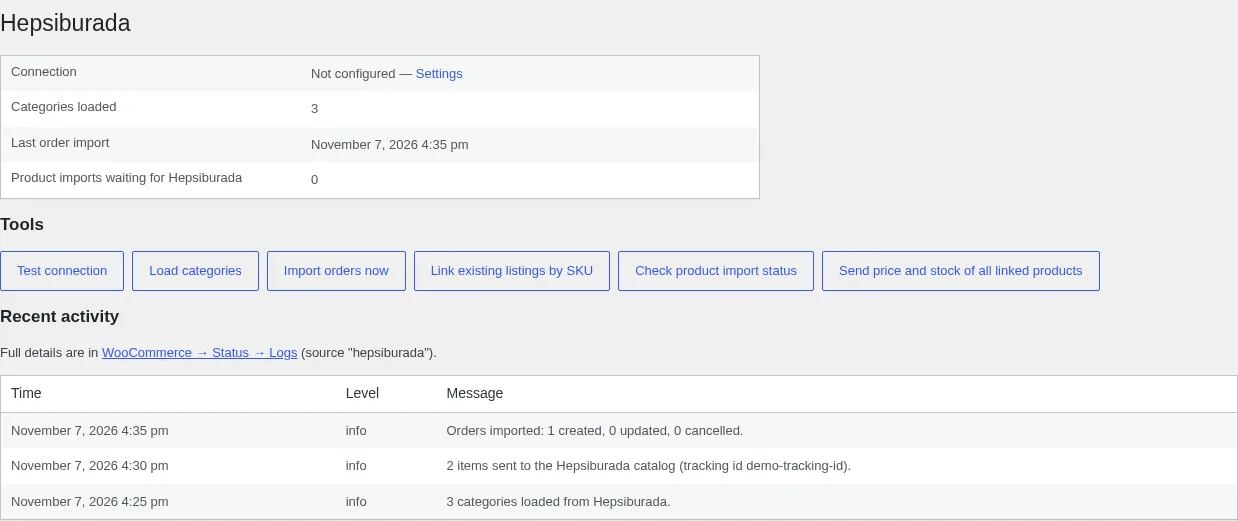
The tools page also shows when orders were last imported, how many product imports are still waiting for Hepsiburada, and a short activity log. Full details are in WooCommerce → Status → Logs (source “hepsiburada”).
4. Choose your product settings
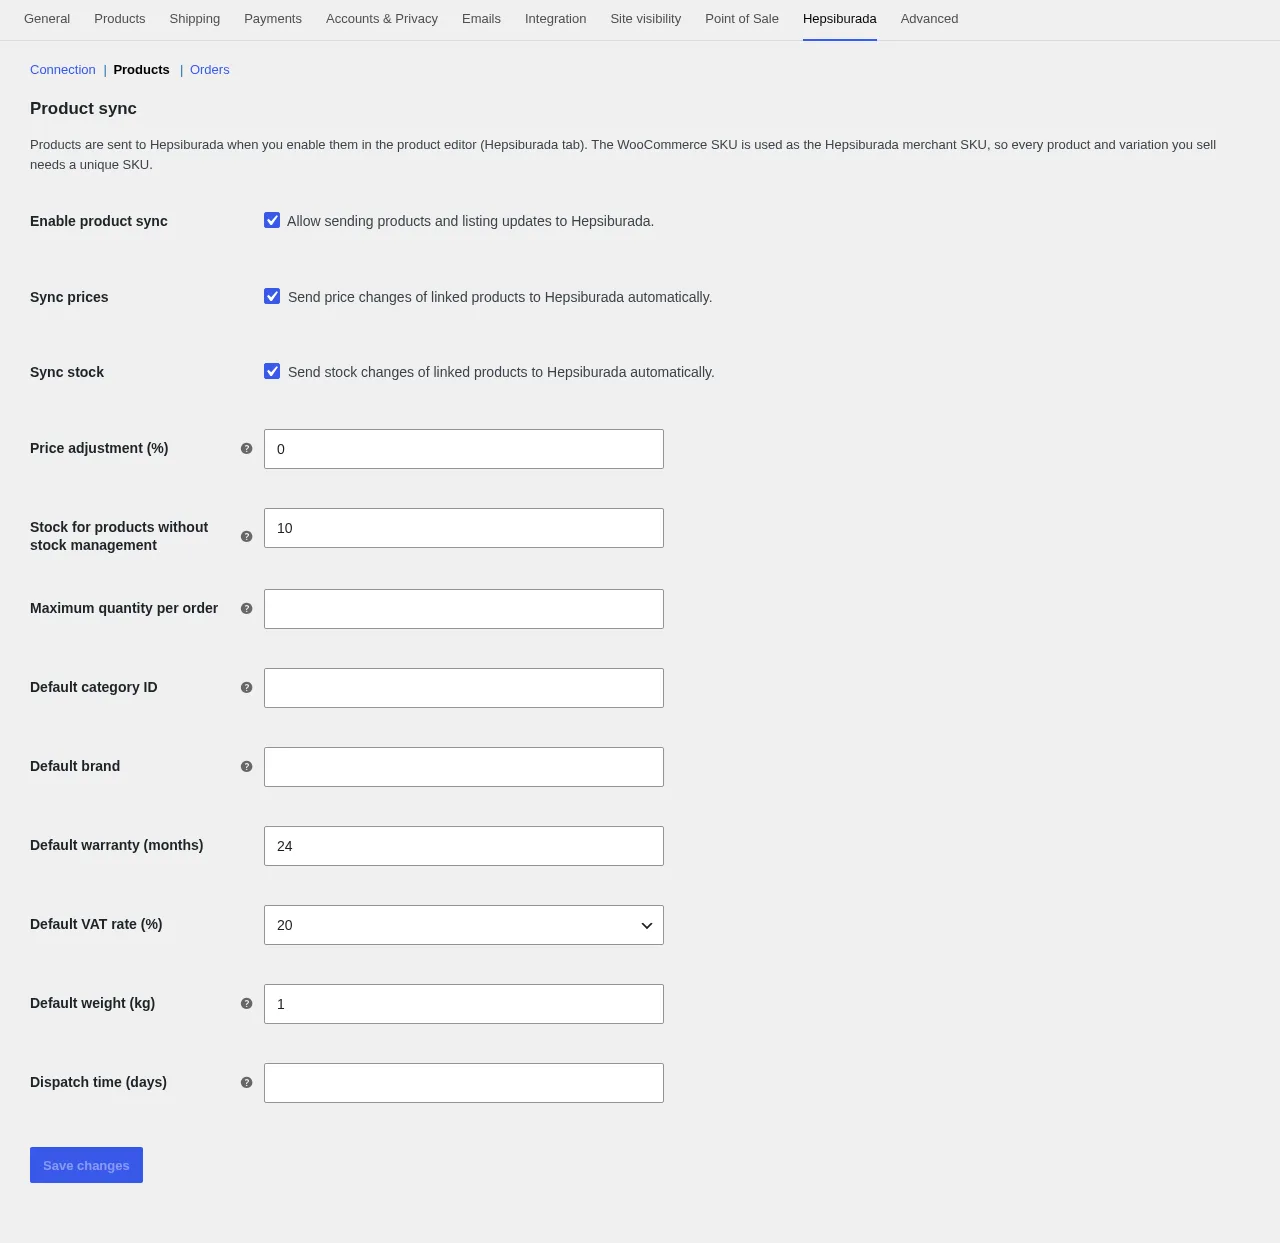
- Go to WooCommerce → Settings → Hepsiburada → Products.
- Keep Sync prices and Sync stock ticked to send changes automatically.
- Set Price adjustment (%) if your Hepsiburada prices should differ from your shop prices, for example
15to add 15%. - Set Stock for products without stock management for in-stock products that don’t track a quantity.
- Fill in the defaults (Default brand, Default warranty (months), Default VAT rate (%), Default weight (kg)) used when a product has no value of its own.
- Click Save changes.
5. Send a simple product
- Edit the product and make sure it has a SKU, a description and at least one image.
- Open the Hepsiburada tab in Product data.
- Tick Sell on Hepsiburada.
- Search for the Hepsiburada category and select it. The category’s attributes appear below.
- Fill in Brand, Barcode (GTIN/EAN) and the Category attributes. Fields marked with * are required by Hepsiburada.
- Optional: set a fixed Hepsiburada price. Leave it empty to use the WooCommerce price with your price adjustment.
- Click Update to save the product, then click Send to Hepsiburada now.
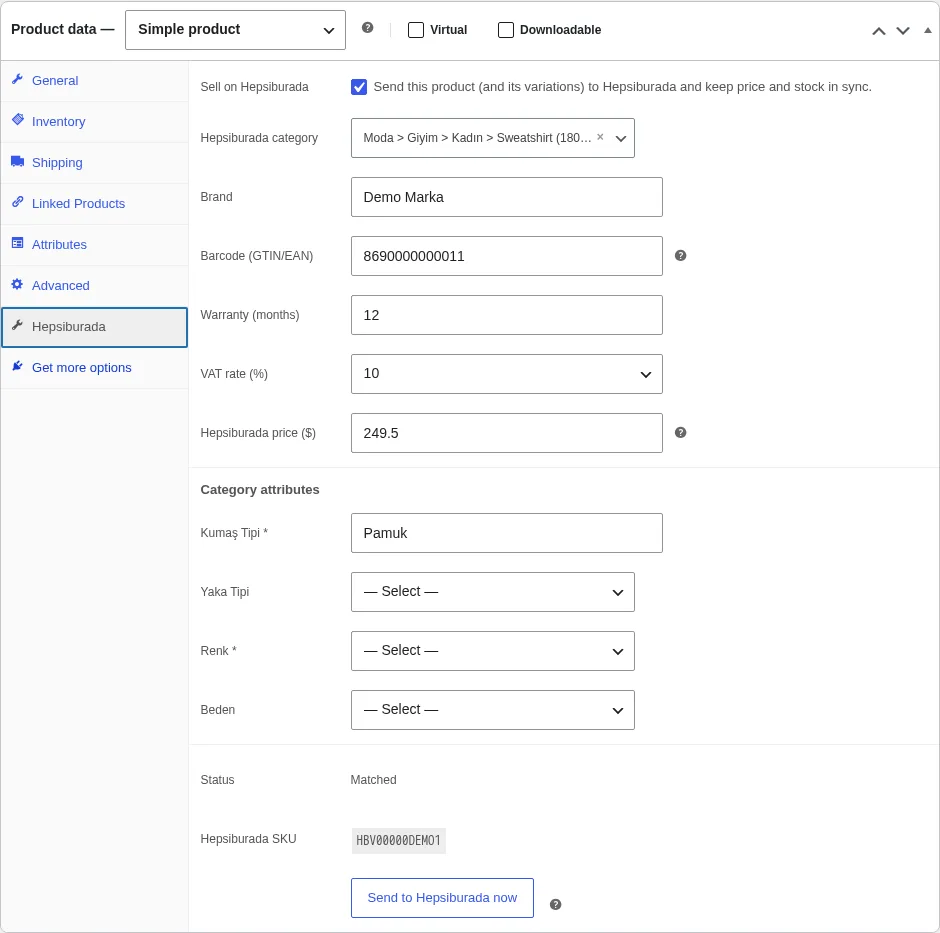
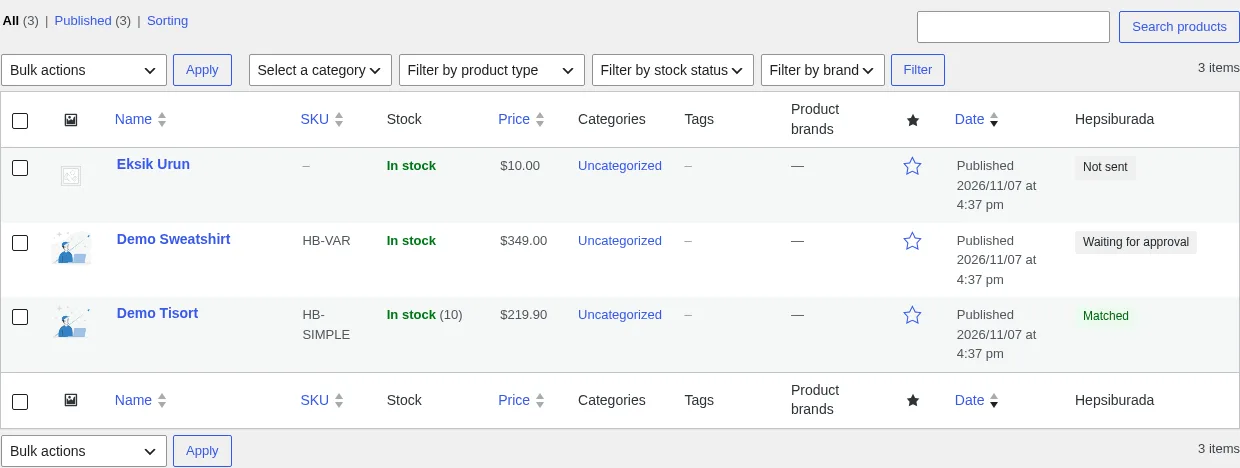
The Status first shows “Waiting for Hepsiburada”. Every 15 minutes the plugin checks the import and updates the status (for example “Waiting for approval”, “Matched” or “Rejected”). When Hepsiburada assigns a product number, it appears as Hepsiburada SKU. If Hepsiburada reports a problem, it appears under Last error.
You can also send many products at once: in Products, select them, choose Send to Hepsiburada in Bulk actions and click Apply.
6. Send a variable product
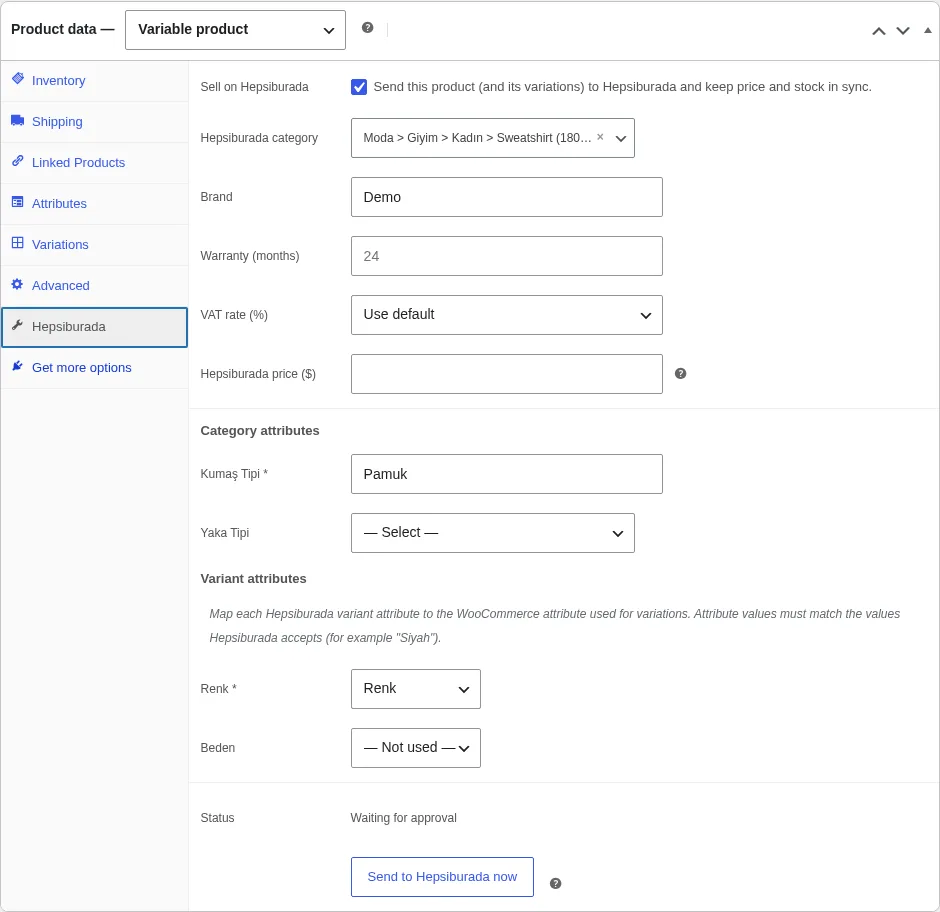
Variations are sent as one Hepsiburada product group, so customers see one product with options such as colour and size.
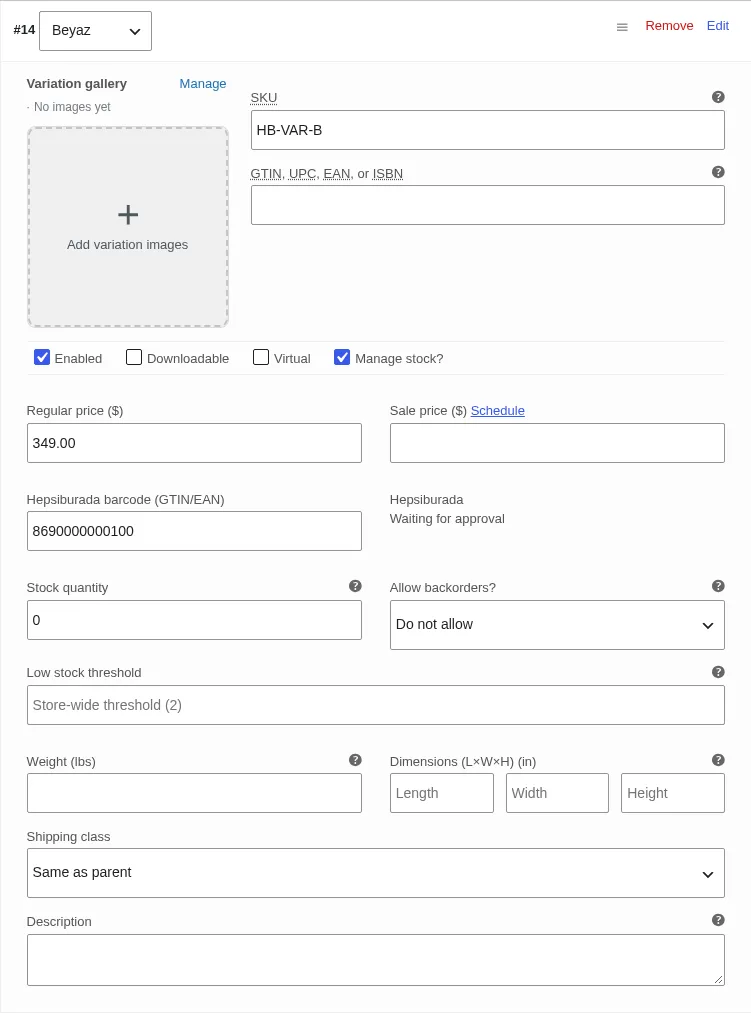
- Give every variation its own SKU.
- Open the Hepsiburada tab, tick Sell on Hepsiburada and choose the category.
- Under Variant attributes, choose which WooCommerce attribute matches each Hepsiburada variant attribute, for example Renk → Color.
- Use attribute values that Hepsiburada accepts, for example “Siyah” rather than “Black”.
- Fill in the Category attributes and click Update.
- Open Variations and enter the Hepsiburada barcode (GTIN/EAN) for each variation. The Hepsiburada status of each variation is shown next to it.
- Click Send to Hepsiburada now on the Hepsiburada tab.
7. Already selling on Hepsiburada?
You don’t need to send existing products again.
- Make sure each WooCommerce SKU is the same as the merchant SKU of the listing on Hepsiburada.
- Go to WooCommerce → Hepsiburada and click Link existing listings by SKU.
Matching products are marked “Linked to listing” and their price and stock are kept in sync from then on. The Hepsiburada column in Products shows each product’s status.
8. Import orders
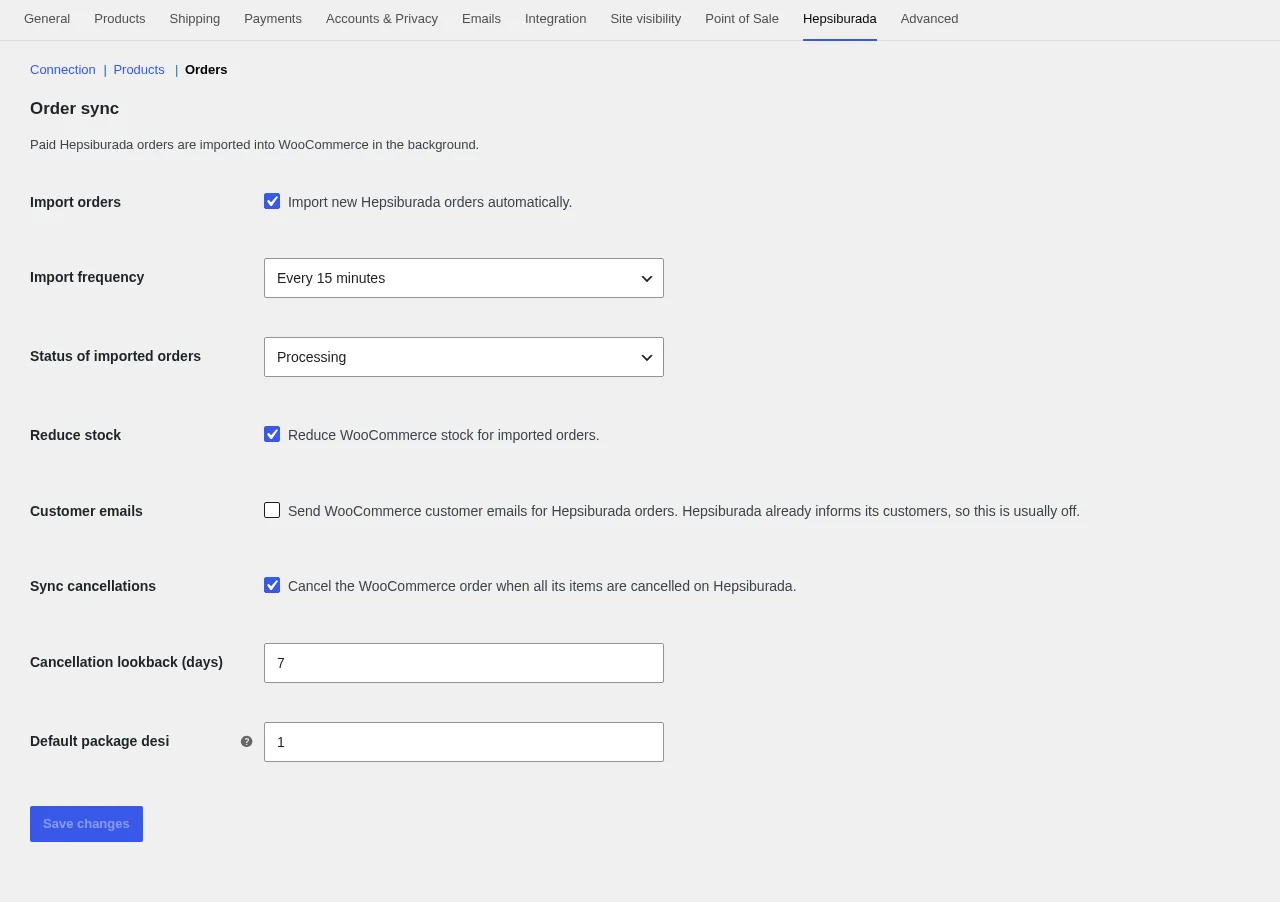
- Go to WooCommerce → Settings → Hepsiburada → Orders.
- Keep Import orders ticked and choose the Import frequency.
- Choose the Status of imported orders, usually Processing.
- Keep Reduce stock ticked so WooCommerce stock goes down for Hepsiburada sales.
- Leave Customer emails off: Hepsiburada already emails its customers.
- Click Save changes.
Paid Hepsiburada orders now appear in WooCommerce → Orders with the customer’s delivery and invoice details. The Hepsiburada column shows the Hepsiburada order number, and you can search orders by it. To import immediately, click Import orders now on the tools page.
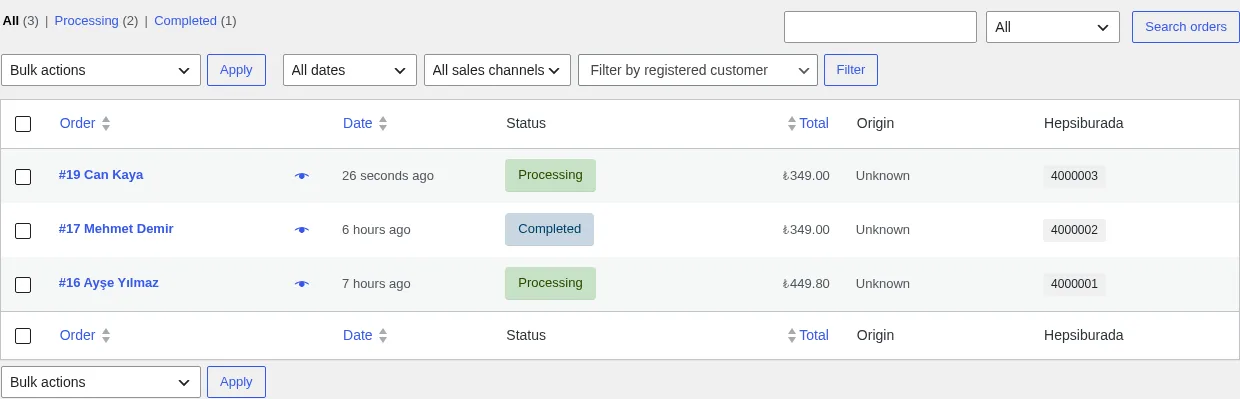
When Sync cancellations is on, an order is cancelled in WooCommerce once all its items are cancelled on Hepsiburada, and its stock is returned.
9. Pack, ship and invoice an order
Open the order. The Hepsiburada box on the right shows the order number, cargo company, the customer’s identity or tax details and the status of each item.
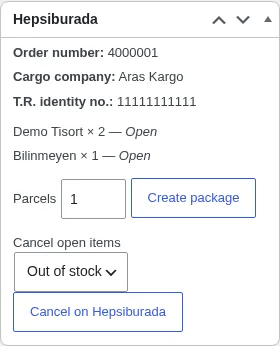
- Set Parcels and click Create package. Hepsiburada returns a package number and barcode, which appear in the box.
- If the order ships with Hepsiburada’s contracted carrier, the carrier collects the package. Click Refresh package status to see its progress. The order is completed automatically when Hepsiburada reports it as delivered.
- If you ship with your own carrier, enter the Tracking number and Tracking URL and click Mark as shipped.
- To send the invoice, paste its public link in Invoice URL and click Send invoice link.
If you can’t fulfil an item, choose a reason under Cancel open items and click Cancel on Hepsiburada. This can only be done before the item is packed and cannot be undone.
Turkish admin
The plugin is translated into Turkish. Set Settings → General → Site Language (or your profile language) to Türkçe and every Hepsiburada screen appears in Turkish.
Troubleshooting
- “Authentication failed” when testing the connection: check the Merchant ID, Service key and Integrator user name, and that Environment matches the details (test details only work in Test, production details only in Production).
- A product shows “Error” or “Rejected”: read Last error on the Hepsiburada tab. The most common causes are a missing SKU, image, brand or required category attribute, or a variant value Hepsiburada doesn’t accept.
- Stock or price did not change on Hepsiburada: the product must be linked (it has a Hepsiburada SKU). Updates are sent in the background within a minute; you can also click Send price and stock of all linked products on the tools page.
- An order item says it has no matching product: the Hepsiburada merchant SKU doesn’t match any WooCommerce SKU. Fix the SKU so future orders match.
- No orders are imported: check that Import orders is on and look at Recent activity on the tools page for the error message.
FAQ
Which product types are supported? Simple and variable products.
Are WooCommerce taxes added to Hepsiburada orders? No. Hepsiburada prices already include VAT, so orders are imported with the totals the customer paid.
Is it compatible with WooCommerce HPOS? Yes, the plugin fully supports High Performance Order Storage.
Does it work with WordPress AI agents? Yes. On WordPress 6.9 and newer the plugin registers Abilities so agents can check the sync status, list Hepsiburada orders, import orders and send a product.